
Aside from the fun factor, bean sprouts are highly nutritious, not to mention delicious gently stir fried. The ones often seen on the supermarket shelves are usually mung beans, although any beans can be sprouted, from alfalfa, adzuki, chick peas, kidney beans, etc... One thing that is not recommended though is mixing the sprouting mix together as sprouting time differs between bean type, environment and batch. Now all grown up (kind of...) I want to try bean sprouting for myself and hopefully encourage you to try it at home too if it all goes well!
According to Cornucopia, to sprout beans I should have in my extensive kit:
- Beans (mung beans, adzuki, chick peas, alfalfa, etc...)
- A large jar
- A 20cm square of muslin/porous cloth
- String/Elastic

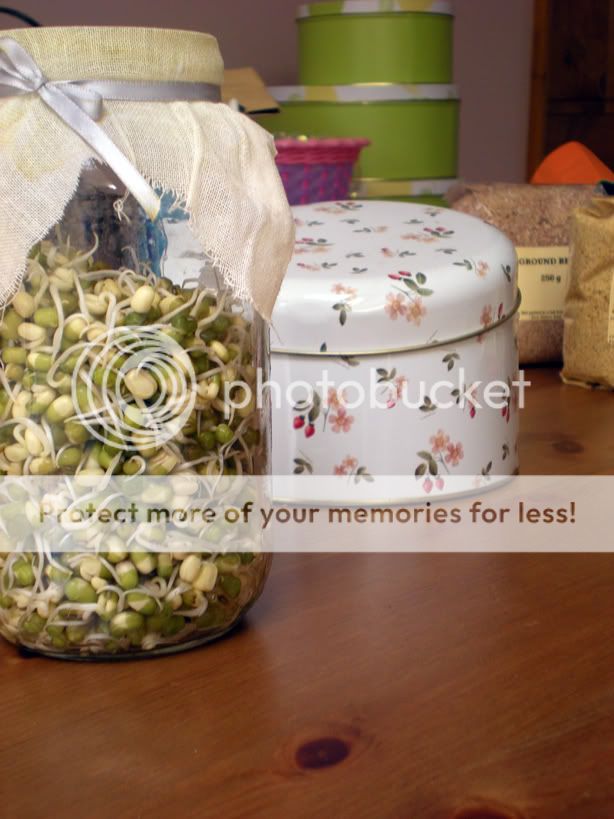
My Sprouting Kit
I went to Fabric Land to get some natural muslin, which was a bargain at less than 50p for a quarter of a metre. After a rummage in the cupboards I found a jar to my liking, and a scrap piece of ribbon in my bedroom found its way to the kitchen. Now all I need is beans to sprout and I'm ready to go!Day 1: To start, it was really simple. Literally fill the jar to about a fifth full with beans then fill with room temperature water. Cover with the muslin square and either tie the string around the jar neck or use a sturdy elastic band to keep the cloth in place. Once assembled, I just needed to stand the jar in a corner somewhere and leave for about 12-15 hours.

Day 2: I woke up this morning and emptied the jar out into the sink, gave it a little shake and left if to sprout some more as I doddled to morning church. I was surprised to see the beans had not only almost doubled in bulk but had begun to sprout already. Exciting times! By the evening there were definite little white tails poking out of the mung bean seeds. Throughout the day whenever I remembered I gave the beans a bit of a swish and rinse. This I am told prevents bitter sprouts which I must say do not sound nearly so tasty. Don't feel the need to constantly do this though as twice to thrice should be enough per day.

Day 3: Wow my sprouts went crazy during the night, I think another day or so and I'll be ready to start eating them!

Day 4: Almost ready! It's now time for me to start contemplating what to do with them... The photo below was taken in the morning, tonight though the jar is full with thickening sprouts, I'm so excited!
Day 5: I woke up to a shocker this morning, with my sprouts straining against the muslin, I gave them a last rinse and now contemplated what to do with them. I like them raw, but they're even lovelier stir fried. They taste nothing like the shop bought bean sprouts; they were so much better, packed full with flavour and fresh crunch. Below I share what I've come up with so far with what to do with home-made bean sprouts.

Looking at my jar I thought there wasn't much but how wrong I was. A large handful later and I still had most of a jar left of bean sprouts. Needless to say I used a generous amount in my stir fry that night, which included celery, cabbage and left-overs of: carrot, onion, butternut squash, boiled new potatoes and black-eyed peas. The resultant meal was delicious, but I must say I must have made enough for two! The quantities given below are enough for two, or if you use just the one noodle portion, then for one very hungry person.

Stir-fried Bean Sprouts with Noodles
(Serves 2)
Ingredients:
- 3-4 Handfuls of mixed vegetables
-such as: potato, celery, carrot, butternut squash, leeks, onions, etc... - A Big handful of Bean sprouts
- Some beans
-such as black eyed peas, chick peas, etc... - 2 Portions of Egg Noodles
- Soya Sauce
- Pepper
- Chilli oil (optional)
- Vegetable Oil to fry
- Coat a large pan with oil and heat on high and bring a pan of water to the boil.
- Add the noodles to the pan and cook for 5 minutes on a simmer until soft, or follow the packet's instructions.
- Add all the vegetables and stir fry over a high heat for 3-5 minutes.
- Season with soya sauce and pepper.
- Drain the noodles, and add to the stir fry, mix and serve. Sprinkle with sesame seeds if you have any!

Having replaced the muslin top and leaving my jar of magical bean sprouts on the counter, I was not expecting it to continue growing at a monster rate. I woke up the next day to find a full jar again and couldn't help thinking of that story about the girl and the never-ending porridge pot... only with bean sprouts! Naturally I had bean sprouts for lunch too... along with half a tin of sardines in a toasted malted bread bap; very nice it was too! You might notice that some of the sprouts have eagerly thrown up some leaves, don't worry about it, I think they look lovely and taste just as good.

Day 7 and my magical sprout jar still appears to be magically refilling, so I had a bean sprout salad made with left over boiled new potatoes, black-eyed peas and bean sprouts gently stir-fried together in a little chilli oil and a generous grinding of pepper.
Verdict? Sprout your own beans! Nutritious, delicious and abundant, it's worth the wait; in fact the wait was exciting. I was amazed by the speed at which the beans sprouted, and felt that if I watched a while longer I would have been able to see the delicate root tails elongating. I hope you've enjoyed following my journey into the land of sprouting beans. Next time I will be trying out chickpeas, adzuki and black eyed peas. Until then, happy sprouting!


No comments:
Post a Comment