Showing posts with label vegan. Show all posts

Saturday, 2 April 2011

How about a cake missing its main three elements?

Is anyone else loving the smell and sight of spring? I walked through an abandoned apple orchard today and as I entered the narrow gap, startled a young doe.  Blossoms were beginning to erupt but it will be several weeks yet before the whole orchard comes into bloom.  Walking down a path lined with pink blossom trees, I remembered the day a funnel of petals were gracefully swirling around me as I cycled to work. It is times like that where I realise and appreciate not just how breathtakingly splendid creation is, but also how transient. Walking down the same path today, the trees are still pink but missing most of their delicate blooms, which were instead adorning the green grass below.

Sitting here still giddy from the sun, I want to share with you yet another gluten free recipe. SPLAT! duty was last week, with the additional request, that not only that these should be gluten and dairy free but now also egg free. So the main components of a cake is basically, dairy (butter), wheat (flour) and eggs.  What happens when all three elements are removed? Some trawling through websites later and I found a perfect recipe on a food forum found here. I am a bit against gluten free flour although must admit it is good in a pinch, but they cost so much I've taken to making up my own mix.  I tend to use 1 part gram flour to 3 parts rice flour. I suspect fine cornmeal (polenta) can be used in place of rice flour too as that is cheaper still! When I get round to trying it, I will report back. Basically I find gram flour adds structure to a cake and acts in many ways as flour does. Its only downfall is its pungent taste when used in too high a proportion and undercooked; blend it with neutral flours though and it acts as a cheap alternative to gluten free flour.

Wandering down South Park today, we encountered a bright red ice cream van. One Mr. Whippy ice cream later, I happily stroll home, with the sun warming my hair celebrating the promise of more such days to come .  Below is my adaptation of the recipe provided in the link above.

Pear Cupcakes
(Makes 12)

Ingredients:
  • 25g/1oz Gram Flour
  • 75g/3oz Rice Flour
  • 1tsp Baking Powder
  • 0.5tsp Bicarbonate of Soda
  • 50g/2oz Brown Sugar
  • 1 Ripe Pear, grated
  • 2Tbsp Golden Syrup
  • 4Tbsp Sunflower Oil

Method:
  1. Pre-heat the oven to GM5/190C/375F
  2. Sift the dry ingredients (minus sugar) into a bowl to remove lumps, stir in the sugar and mix to combine.
  3. Finely grate the pear directly into the bowl, discarding the resultant lump of skin and pips and mix until well combined.
  4. Pour 1Tbsp of oil oil into the bowl then measure out 1Tbsp of golden syrup then repeat with the oil then golden syrup, then add the last 2Tbsp of oil. This helps the syrup not to stick to the spoon! Beat or whisk the mixture until well combined then spoon equally between 12 cases. 
  5. Bake for about 25 minutes until browned and springy to the touch. 

Thursday, 10 February 2011

Gluten-Free and Dairy-Free Muffins

Every month or so I have cake duty for SPLAT! at St Ebbes, a play group for toddlers where mummies can enjoy a slice of cake, hear about Jesus and just socialise.  I get the special dietary requirements duty and I've had some good results and some not so good results when trying to produce cakes and biscuits which contained no wheat, milk, butter, oats.... apart from the Tunisian orange cake and layered chocolate cake, the rest tend to either go stale immediately or taste powdery and dry, or worst: taste and feel disgusting, so much so I feel bad handing them over!

My birthday was in December and amongst my wish list was a dinky little book written by Jennifer Katzinger, founder of the Flying Apron Bakery based in Seattle.  Apart from type errors regarding number of muffin cups to pour batter into, it is a very good read and the recipes work beautifully - well the two that I've tried.  I won't lie, the batter looked unpromising, but the result was magic.  There's no other word for it when I think about what goes into your typical muffin: flour, butter, sugar, eggs.... all of which are absent from these deliciously soft muffins.  If you're intolerant to gluten or dairy, or just vegan, this book is amazing.  Naturally the honey is easily interchanged with agave nectar or maple syrup.  Below, I'll leave you with two recipes adapted from my beloved copy of the flying apron's gluten-free and vegan baking book.

Carrot Muffins
(Makes 16)

Ingredients:
  • 1C Rice Flour
  • 1/2C + 1/8C Gram Flour
  • 0.75 tsp Bicarbonate of Soda
  • 0.75 tsp Ground Cinnamon 
  • 1/2C Groundnut Oil
  • 1C Water
  • 1C Honey
  • 3 Sm Carrots, Finely grated
  • 1C Unsweetened Dessicated Coconut
  • 1C Chopped Mixed Nuts
  • 1/2C Mixed Dried Fruit
Method:
  1. Pre-heat the oven to GM4/180C/350F
  2. In a large bowl, mix together the oil, water and honey.  In another bowl mix together the carrots, nuts, fruit and coconut, and in a final bowl, mix together the rice and gram flours, cinnamon and bicarbonate of soda.
  3. Whisk the flour mix into the wet mixture until well combined.  Fold in the carrot mixture until just combined and divide among muffin cases.
  4. Bake for 20-30 minutes until the tops are  golden and firm to the touch.


Lemon & Poppy Seed Muffins
(Makes 14)

Ingredients:
  • 1.5C Rice Flour
  • 3/4C Gram flour
  • 1.5 tsp Bicarbonate of Soda
  • 1/2C Olive Oil
  • 1C Water
  • 1/2tsp Cider Vinegar
  • 1/2C Maple Syrup
  • 1/2C Golden Syrup
  • Zest of 2 Lemons
  • 1/3C Poppy Seeds 
Method:
  1. Pre-heat the oven to GM5/190C/375F
  2. In a large bowl, mix together the oil, water, vinegar, golden and maple syrup.  In another bowl, whisk the rice flour, gram flour, bicarbonate of soda, poppy seeds and lemon zest together well.
  3. Whisk the dry mixture into the wet mixture until well combined.  
  4. Pour the batter evenly between about 14 muffin cases and bake for 20 to 25 minutes until golden and firm to the touch.

Monday, 7 February 2011

Carrot and Coriander Plait

I feel I should start this post with a huge apology for being out of action for so long.  Time has flown by in the last couple of months, but now that the festive season is over and life is returning to normal, I should hopefully be back to cooking lots and sharing them with you.  I thought would start the beginning of a new month with bread. We can't go wrong with bread, bread makes my world go round.  Even better, homemade bread... and better than that? Flavoured bread! I decided on carrot and toasted coriander seeds this time, and it was wonderful.  The loaf came out of the oven golden orange with flecks of coriander seeds peeking out at me.

I love making bread, especially on a day where I'm not needed anywhere. Making bread is associated to a day of rest for me.  I knead the dough at my own pace, lovingly tip it into an oiled bowl and potter around the house until it's ready to be knocked down and shaped.  This time I decided to take a walk with my new house mate in the late winter sun, enjoying the warmth on my face as we trundle along.  This time of year is wonderful. Everything smells of hope and a taster of spring is beginning to creep in, reminding me it is only a few months before the sight of daffodils and other colourful joys start popping up again.  Until then though, we have cheerful bread...

Carrot and Coriander Bread
(Makes 2Lb Loaf)


Ingredients:
  • 375g Plain Flour
  • 125g Wholemeal Flour
  • A pinch of Salt
  • 70ml Vegetable Oil
  • 1.5 tsp Dried Yeast
  • 240ml Warm Water
  • 1 medium Carrot, peeled and grated
  • 1 Tbsp Coriander Seeds

Method:
  1. Mix the yeast and warm water together and leave for 15 minutes to activate and a frothy layer forms on top.
  2. Toast the coriander seeds over a medium heat in a frying pan until lightly browned and aromatic. Tip into a pestle and mortar to bruise the seeds.
  3. Mix together the flours and salt, then combine with the oil.  Once evenly distributed, grate in the carrot and tip in the coriander seeds.  Stir to distribute.
  4. Make a well, pour in the yeast mixture, stir to make a dough and roll out onto a lightly floured surface to knead.  Knead for about 10 minutes until smooth and elastic, and tip into a lightly oiled bowl.  Leave covered in a warm place to double in bulk for about an hour and a half.
  5. Knock the dough down, divide into three balls and roll each one into a long sausage shape.  Press the ends together on one end and plait the strands, sealing the ends together. Pat into shape and leave to prove for 30 minutes more, covered.  Switch on the oven to GM 4/180C/350F to pre-heat.
  6. Bake the plait for 40-45 minutes until lightly golden and the base sounds hollow when knocked.  Turn out onto a wire rack to cool.

Tuesday, 12 October 2010

Forcaccia and the first of the Autumn Soups

My last post raved about the beauty of autumn, but does anyone else feel the slight pressure to cling to the light meals of summer still?  It is that strange phase of change where my body just has not had a chance to adapt yet.  The weather so far has swung between summer sunshine to waking up to a sparkling frost blanketed scene.  Autumn's harvest bounty is steadily growing though so I thought I would introduce the first of my experimental autumn recipes.  Naturally it would be soup, and naturally I would find inspiration for it by rummaging through my fridge.  Stupidly though after a thorough search through my house, the scrap of paper containing my recipe is gone (for good? who knows?) so I will have to just let your imagination fill in the blank!  It involved carrots, parsnips, celery, mushrooms and soya sauce, partially blended to make a thick earthy broth.


The other night as I was on a baking spree, I decided to make some bread again.  I feel the bread section of this blog needs padding out and bread making is just the most satisfying experience.  This time, after being tempted to make some Mediterranean forcaccia I settled for some aromatic fennel forcaccia instead which has a milder flavour so more potential for different sandwich fillings!  Happily I discovered that fennel forcaccia and ugly root vegetable autumn soup marries together beautifully with lashings of butter.

I also love it sliced in half with butter and yeast extract for breakfast, hummous with St-Paulin cheese for lunch or spread thickly with yummy jam as an any-time snack.

Fennel Sandwich Forcaccia:
(Serves 8-10)

Ingredients:
  • 2 Cups Warm water
  • 1.5tsp/7g Sachet Dry yeast
  • 1tsp Sugar
  • 3Tbsp Extra virgin olive oil
    -plus extra to glaze
  • 1.50tsp Salt
  • 1Tbsp Fennel seeds
    -plus extra to spirinkle
  • 1 Cup Wholemeal/Brown flour
  • 5 Cups Plain/Bread Flour
  • About 2Tbsp Cornmeal/Polenta to dust
Method:
  1. Stir the yeast and sugar into the warm water and leave until foamy - at least 10 minutes.
  2. In a bowl, mix togehther  along with the yeast mixture, wholemeal flour, salt and olive oil.
  3. Gradually add the remaining flour until a dough forms and turn out onto a floured surface and knead until smooth.  Return the dough to an oiled bowl, coat in the oil by rolling then cover with a damp tea towel or cling film.  Leave the dough to rise until doubled in bulk - At least an hour.
  4. Oil a baking sheet/pan and dust with fine cornmeal/polenta, then roll out the dough to roughly fit the pan.
  5. Press the dough into the pan until about even, cover and let rise for another hour or so.  The dough should be tender to the touch.
  6. Preheat the oven to Gas Mark 6/200C/400F during the last 15 minutes.
  7. Dimple the dough with fingertips, brush with olive oil, sprinkle with fennel seeds and bake for 30 minutes in the bottom third of your oven, or until lightly golden.  Cool on a wire rack. 

Thursday, 19 August 2010

Peas Please!

Last week my house mate left me for France and also left a bag of peas in their pods.  I only just re-discovered them today and needless to say I did not have a clue what to do with them.  I spent today helping out my church preparing for holiday club, and must admit to scoffing one too many cupcakes and biscuits, a childish mistake which resulted in a ruined appetite for dinner.  Looking at the peas, looking at my stomach which refused to be hungry for real food, and looking back at the pods, I decided some podding was in order, and hopefully the sight of shiny green peas popping out might re-ignite my appetite.  Meanwhile though, a coffee and cupcake was in order to see me through the podding... (some people do NOT learn...)


Thinking about peas invariably always leads to thinking about mint, so one wet but short trek later to our mint weed patch and a handful of mint joined my shiny peas.  A rogue new potato was found in my cupboard along with a fat clove of garlic sitting around the work top hoping to be useful, a small onion rolls on scene and I am suddenly inspired to make soup!  In hindsight, lemon juice would have been a welcome addition, the acid adds another sparkling dimension to the soup, magically pulling all the flavours together.  Next time... I decided to pulse blend the soup to add some texture, a generous grind of pepper and a drizzle of plain yoghurt later and enjoyed a lovely light meal which felt healthy, therefore (in my opinion) justifying the copious cupcake eating I did today...

Fresh Pea Soup
(Serves 1)


Ingredients:

  • 1 Small potato (about 50g)
  • 75g Peas (podded weight)
  • 1 Small Onion
  • 1 Clove Garlic
  • Handful of mint (about 10g)
  • 300ml Water or stock
  • 1tsp Olive Oil
  • Squeeze of lemon
  • Salt and Pepper
  • Plain Yoghurt to garnish
Method:

  1. Heat the oil in a small pan, slice the onions, crush and mince the garlic then add to the pan and gently fry for about 5 minutes, covered.
  2. Cube the potato in 5mm cubes and add to the pan, stirring to coat in the juices.  Cover and continue to cook gently for about 5 minutes.
  3. Add the peas and water, bring to the boil, season and simmer for 20-30 minutes until all the vegetables are tender (fresh peas take a lot longer to cook compared to frozen - adjust time accordingly).  Add the mint in the last 10 minutes of cooking.
  4. Blend the soup roughly by using a pulse motion with the blender, so some peas stay intact.
  5. Squeeze in pepper and lemon juice to taste then serve with a dollop of plain yoghurt.

Friday, 6 August 2010

Sprouting Beans

The one thing that keeps popping to my attention a lot recently is how to sprout beans in the comfort of my own home. I first read about it in my favourite cookbook: Cornucopia at Home. I proceeded to encounter the subject as I continued to read other cookbooks, such as Vegan Rustic Cooking and The Cranks Recipe Book. Although I have never attempted it, I remember my parents doing it as standard when I was a child. It was such a fun process to watch, seeing little white tails appear from mung beans lying on a wet paper towel.

Aside from the fun factor, bean sprouts are highly nutritious, not to mention delicious gently stir fried.  The ones often seen on the supermarket shelves are usually mung beans, although any beans can be sprouted, from alfalfa, adzuki, chick peas, kidney beans, etc... One thing that is not recommended though is mixing the sprouting mix together as sprouting time differs between bean type, environment and batch.  Now all grown up (kind of...) I want to try bean sprouting for myself and hopefully encourage you to try it at home too if it all goes well!

According to Cornucopia, to sprout beans I should have in my extensive kit:
  • Beans (mung beans, adzuki, chick peas, alfalfa, etc...)
  • A large jar
  • A 20cm square of muslin/porous cloth
  • String/Elastic
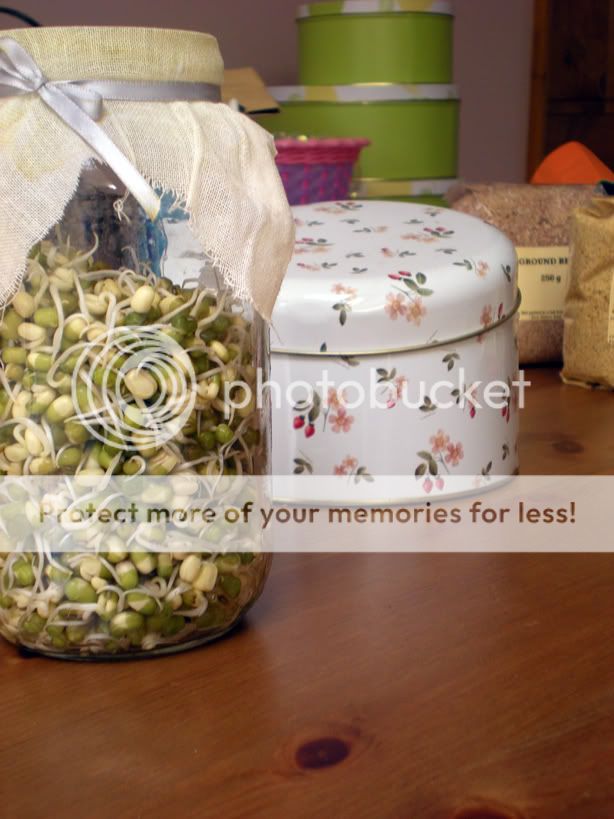
     My Sprouting Kit
    I went to Fabric Land to get some natural muslin, which was a bargain at less than 50p for a quarter of a metre.  After a rummage in the cupboards I found a jar to my liking, and a scrap piece of ribbon in my bedroom found its way to the kitchen. Now all I need is beans to sprout and I'm ready to go!

    Day 1: To start, it was really simple.  Literally fill the jar to about a fifth full with beans then fill with room temperature water.  Cover with the muslin square and either tie the string around the jar neck or use a sturdy elastic band to keep the cloth in place.  Once assembled, I just needed to stand the jar in a corner somewhere and leave for about 12-15 hours.


    Day 2: I woke up this morning and emptied the jar out into the sink, gave it a little shake and left if to sprout some more as I doddled to morning church.  I was surprised to see the beans had not only almost doubled in bulk but had begun to sprout already.  Exciting times!  By the evening there were definite little white tails poking out of the mung bean seeds.  Throughout the day whenever I remembered I gave the beans a bit of a swish and rinse.  This I am told prevents bitter sprouts which I must say do not sound nearly so tasty.  Don't feel the need to constantly do this though as twice to thrice should be enough per day.


    Day 3: Wow my sprouts went crazy during the night, I think another day or so and I'll be ready to start eating them!


    Day 4: Almost ready! It's now time for me to start contemplating what to do with them...  The photo below was taken in the morning, tonight though the jar is full with thickening sprouts, I'm so excited!


    Day 5:  I woke up to a shocker this morning, with my sprouts straining against the muslin, I gave them a last rinse and now contemplated what to do with them.  I like them raw, but they're even lovelier stir fried.  They taste nothing like the shop bought bean sprouts; they were so much better, packed full with flavour and fresh crunch.  Below I share what I've come up with so far with what to do with home-made bean sprouts.


    Looking at my jar I thought there wasn't much but how wrong I was.  A large handful later and I still had most of a jar left of bean sprouts.  Needless to say I used a generous amount in my stir fry that night, which included celery, cabbage and left-overs of: carrot, onion, butternut squash, boiled new potatoes and black-eyed peas.  The resultant meal was delicious, but I must say I must have made enough for two! The quantities given below are enough for two, or if you use just the one noodle portion, then for one very hungry person.


    Stir-fried Bean Sprouts with Noodles
    (Serves 2)


    Ingredients:
    • 3-4 Handfuls of mixed vegetables
          -such as: potato, celery, carrot, butternut squash, leeks, onions, etc...
    • A Big handful of Bean sprouts
    • Some beans
        -such as black eyed peas, chick peas, etc...
    • 2 Portions of Egg Noodles
    • Soya Sauce
    • Pepper
    • Chilli oil (optional)
    • Vegetable Oil to fry
    Method:
    1. Coat a large pan with oil and heat on high and bring a pan of water to the boil.
    2. Add the noodles to the pan and cook for 5 minutes on a simmer until soft, or follow the packet's instructions. 
    3. Add all the vegetables and stir fry over a high heat for 3-5 minutes.
    4. Season with soya sauce and pepper.
    5. Drain the noodles, and add to the stir fry, mix and serve.  Sprinkle with sesame seeds if you have any!

    Having replaced the muslin top and leaving my jar of magical bean sprouts on the counter, I was not expecting it to continue growing at a monster rate.  I woke up the next day to find a full jar again and couldn't help thinking of that story about the girl and the never-ending porridge pot... only with bean sprouts!  Naturally I had bean sprouts for lunch too... along with half a tin of sardines in a toasted malted bread bap; very nice it was too! You might notice that some of the sprouts have eagerly thrown up some leaves, don't worry about it, I think they look lovely and taste just as good.


    Day 7 and my magical sprout jar still appears to be magically refilling, so I had a bean sprout salad made with left over boiled new potatoes, black-eyed peas and bean sprouts gently stir-fried together in a little chilli oil and a generous grinding of pepper.

    Verdict? Sprout your own beans! Nutritious, delicious and abundant, it's worth the wait; in fact the wait was exciting.  I was amazed by the speed at which the beans sprouted, and felt that if I watched a while longer I would have been able to see the delicate root tails elongating.  I hope you've enjoyed following my journey into the land of sprouting beans.  Next time I will be trying out chickpeas, adzuki and black eyed peas.  Until then, happy sprouting!

    Monday, 2 August 2010

    Project Frugal: Day One

    Graduation was a celebration in no longer being a student and becoming a qualified adult, able to find a job.  I am currently in the position of having three jobs but no hours, so money has pretty much stopped coming in from May time.  My holiday at home was spent working the odd shift at my beloved cinema, but not nearly so many hours as before and it shows: the total earnings made last month whilst in Southampton is just enough to cover rent for a month and naught else in Oxford.  Like everything else - blame it on the credit crunch!  Today, two months after graduation and I was finally contemplating approaching the job agencies when in answer to my prayers, I received a startling email from my manager offering me a full-time job in something I truly love: Academic Support Work.  Effort involved in finding a job? Nil.  I'm happy with that, I can't wait to start!  Until I begin my job though, I have to wait a month which means for at least a month and a half I still have no funds and limited savings... what's a girl to do?

    That was an easy answer once I returned to Oxford and realised just how much food I had managed to hoard over the year, tightly packed into my freezer and cupboards.  So my mission is to buy as little as possible in terms of fresh food so that I can start making things from the pantry and freezer.  The aim is to use up my stocks of flour, dried beans, spices, dried condiments, freezer meals and stocks, frozen vegetables, etc... And buy as little as possible.  Each week I aim to post how much I have spent on food, so that you will hopefully see that it is possible to live on a frugal diet and have fun and tasty food at the same time!

    My housemate works as a cleaner in one of the student halls, and as a result brings home the weirdest things in terms of food sometimes.  Often it is not quite weird food, more the sheer quantity of food.  For instance, one day as a present she brought home a big bag of mung and adzuki beans, along with a monster bag of black eyed peas.  Although I normally eat black eyed peas, even this bag has stumped how we were going to get through it.  So far bean burgers have been made, stews and soups and we still have a way to go.  Today a batch was cooked up, ready to sit ready in the fridge or freezer for future use; with the cooking water and a 400g tin's worth of the cooked peas going towards my first frugal dish: Ugly Duckling Soup (recipe below).  No ducklings were harmed in the making of this soup, it tasted delicious and is 100% vegan friendly, but I can't say it was the prettiest soup I have ever made, what with the black eyed peas turning the soup into a murky red clay colour.  Dubiously, I poured it into a bowl for lunch to have with some cream crackers and some donated lemon and coriander hummus (Lidl's finest so not great...).  The first mouthful was a surprise, the peas and celery had lent the soup an earthy flavour with satisfying hints of bay leaf, and sweet notes from the red peppers.  I only blended a small portion of the soup to thicken it so that separate colours and textures from the pepper and other vegetables were retained. A few hours later and I was still full, so not only lovely to have but filling too!  I loved it so much I happily had it for dinner with a toasted and buttered malted bap.  If you ever feel the need to try this soup, don't be fooled by the colour, looks are deceiving!  Of course tinned black eyed peas can be used, or some other bean - being frugal gives one the freedom to experiment!  I soaked my black eyed peas overnight (about 1.5 Cups) in cold water then boiled briskly for 10 minutes the next morning and left to simmer for 25 minutes further until tender.  I reserved the cooking liquid for the soup (which turned the whole thing into a mud pool), but if you don't have the cooking liquid, feel free to use either stock or just water.

    On another subject of free food, the season of blackberries is almost here and on a little detour through a nature reserve today, I happily picked a handful to take home to munch later.  On the way out of my road I also spotted a plum tree and another one down a route I sometimes take to the shops.  I can't wait to start catching ripe plums too!  In the meantime though, bon appétit!

    Ugly Duckling Soup:
    (Serves 2)


    Ingredients: 
    • 1 Small Onion, sliced
    • 1 Clove Garlic, crushed and chopped
    • 1 Stick of Celery, sliced into disks
    • 1 Small/1/2 Large Carrot, peeled and diced
    • 1 Small/1/2 Large Red pepper, diced
    • 100g Dried Black-eyed beans, cooked
       -or a 400g Tin - save the water for the soup
    • 1 Bay leaf
    • Salt and Pepper to taste
    • About 1Pt Water/Stock
    • 1/2Tbsp Olive (or any) Oil  
    Method:
    1. Pour enough oil to cover the base of a small pan and heat.  Add the onions, garlic, carrot, celery, pepper and bay leaf.  Cover the pan and gently fry for 5-10 minutes, stirring occasionally until the onions are soft.
    2. Add the black eyed peas and cooking water or stock to cover everything in the pan, stir once and bring to the boil.  Lower the heat and simmer for 20 minutes or until all the vegetables are tender.
    3. Remove the bay leaf and ladle out some of the vegetable and some liquid and blend until smooth then stir back into the soup to thicken, season and serve.

    Sunday, 25 July 2010

    A Time to Relax

    Church today was filled with kids, which means summer holidays must have begun.  The service was filled with laughter as we tried to learn a bible verse (Luke 19:v10) and failed miserably, with the adults mumbling and stumbling in unison, much I feel to the amusement of the surrounding children.  I had coffee and a quick chat afterwards with my new friend then had to dash off to buy bread before heading home for a quick lunch which happened to be homemade grilled pepper soup (recipe below).  A friend of mine was coming from Oxford today to see another friend of mine in Southampton, and we decided to meet at the docks, so waltzing out again, I set out to meet them.  After a bit of hunting I spotted them wandering in a park close to the agreed rendezvous, it turned out they had gotten a bit lost en route.

    Seagulls gliding along the water

    My friend who has now lived in Southampton for close to a year still didn't know the docks properly so off we all strolled towards the Mayflower Park.  This place is spectacular on sunny days and watching the sun set over the sea is just breath taking.  Sometimes, it sets over the hill which is equally wonderous to look at.  We siddled down the concrete slope leading to the waters and perched on the edge to while away a few hours watching the seagulls flutter over bread and watching the water ripple over the seaweed and concrete slope edge.  With the sun warming out faces and feet we caught up on people we haven't seen in a while and the current of state each other's lives, shortly interrupted by a drunken wanderer who started joyfully proclaiming the tastiness of pigeons and seagulls.  After a brief polite and rather amused conversation with him, he happily ambled off away down the pier leaving us once again to the calm quiet of the sea and seagulls, a gentle warm breeze blowing against our shoulders.


    The Mayflower

    After some time with the sun still strong behind the clouds, we moved on to Harbour Lights for a well deserved coffee on the terrace overlooking the boats.  We caught the tail end of the Inception crowd but once we were served our coffees in their colourful and mismatched cups, we settled down for another few hours outside looking at the rows of shiny white boats all safely docked, bobbing gently up and down.  Isn't it amazing how fast time flies when with good friends? Sadly the day came to an end and we walked our seperate ways, the Little Lady getting a bus home and the Anthropologist making his way back to Southampton Central train station going back to Oxford.  Overall, a very good end to the week I feel.

     Looking out onto the docks

    Grilled Pepper Soup
    (Serves 2)

    Ingredients:
    • 2 Small Onions
    • 1 Clove Garlic
    • 1 Carrot 
    • 4 Small Red bell peppers
    • 2 Tomatoes
    • A generous pinch of mixed herbs
    • 1Tbsp Vegetable oil 
    • Salt and Pepper
    • Bread and Butter to serve
    Method:
    1. Over a low heat, add enough oil to coat the base of your pan.
    2. Chop the onions and carrot, crush the garlic and add to a pan and gently fry for 5-10 minutes with the lid on, stirring or shaking occasionally until soft.
    3. Meanwhile, halve the tomatoes and pepper, removing the pepper seed and lay skin side up on a grill pan.  Set the grill to high and grill them until their skins are charred and remove to a bowl and clingfilm until cool enough to handle - about 5-10 minutes.
    4. Peel the pepper and tomatoes and chop roughly and add to the pan along with the herb and about 1 pint water.  Bring the pan to the boil and lower the heat simmering the soup for 25-30 minutes until all the vegetables are tender.
    5. Blend the soup roughly, season with salt and pepper and serve hot with bread and butter.
     Grilled pepper and tomato soup

    Saturday, 10 July 2010

    Summertime and the picnics are waiting

    One of the many joys of summer are the numerous fun ways of dining. Recently I organised a picnic with some friends I love to go dancing with. The feast included homemade rosemary and onion seed focaccia, stuffed with homemade marinated grilled peppers with pesto, salad and mozzarella. Juicy fresh apricots, satsumas, apples and strawberries with cream added a fresh and healthier tone to the day balanced out with butterfly fairy cakes made with a yoghurt frosting and strawberries.

    Part of our Picnic Feast

    The day was wonderful filled with sun, laughter and dancing - a perfect day! I look forward to similar days whilst England continues its summery trend.
     
    Sandwich Focaccia with Rosemary
    (Serves 8-10)
     -adapted from Vegetarian Cooking for Everyone by Deborah Madison


    Ingredients:
    • 2 Cups Warm water
    • 2.25tsp/7g/1 Sachet Dry yeast
    • 1tsp Sugar
    • 3Tbsp Extra virgin olive oil
      -plus extra to glaze
    • 1.50tsp Salt
    • 1-2Tbsp Rosemary
    • 1 Cup Wholemeal/Brown flour
    • 5 Cups Plain/Bread Flour
    • About 2Tbsp Cornmeal/Polenta to dust
    • 1Tbsp Black Onion Seeds
    Method:
    1. Stir the yeast and sugar into the warm water and leave until foamy - at least 10 minutes.
    2. Pound or chop the rosemary until finely minced and add to an oiled bowl along with the yeast mixture, wholemeal flour, salt and olive oil.
    3. Gradually add the remaining flour until a dough forms and turn out onto a floured surface and knead until smooth.  Return the dough to an oiled bowl, coat in the oil by rolling then cover with a damp tea towel or cling film.  Leave the dough to rise until doubled in bulk - At least an hour.
    4. Oil a baking sheet/pan and dust with fine cornmeal/polenta, then roll out the dough to roughly fit the pan.
    5. Press the dough into the pan until about even, cover and let rise for another hour or so.  The dough should be tender to the touch.
    6. Preheat the oven to Gas Mark 6/200C/400F during the last 15 minutes.
    7. Dimple the dough with fingertips, brush with olive oil, sprinkle with onion seeds or more rosemary and bake for 30 minutes in the bottom third of your oven, or until lightly golden.
    Marinated Grilled Peppers:

    Ingredients:
    • 2 Large Red peppers
    • 3 Cloves of Garlic, crushed
    • Vegetable oil to cover - About 100ml
    • 10 Sundried tomatoes in oil, chopped
      -or reconstituted from dried
    • 1-2tsp Sundried tomato puree/paste 
    • 1-3tsp Balsamic vinegar
    • 1-2 dried chillies, crushed
    • Mixed Herbs
    • Salt and Pepper to taste
    Method:
    1. Half and seed the peppers then lay skin-side up under a hot grill.  Grill for about 5-10 minutes or until the skin blisters and becomes charred in places.
    2. Remove to a bowl and cover with clingfilm until cool enough to handle - about 5 minutes.
    3. Meanwhile make the marinade in a small pot (about 200ml) by mixing together the sundried tomatoes, balsamic vinegar, tomato puree, herbs, chillies, salt and pepper.  Dilute with 1-2Tbsp vegetable oil.  Any cheap oil will do here as it only acts as a flavour carrier. 
    4. Peel the peppers and slice thinly.  Mix into the marinade well, coating all the slices and compact into the pot.  Add more oil until just covered and leave for a few hours, preferably over night in the fridge.  The smell and taste the next day is amazing.
    Mediterranean Focaccia Sandwich:
    (Makes 8-10)

    Ingredients: 
    • Focaccia Bread, cut into sqaures (See above for recipe)
    • Marinated grilled peppers (See above for recipe)
    • Pesto (shop-bought or homemade)
    • Sundried tomato paste/puree
    • Mozzarella, sliced
    • Salad Leaves
    • Brown/Greaseproof paper and string to wrap

    Method:
    1. Slice each focaccia square in half and spread with pesto on one side and sundried tomato paste on the other.
    2. Drain most of the oil off the peppers and layer with the marinated sundried tomatoes onto one side the focaccia. Layer some salad leaves on top then some sliced mozzarella and more salad, place the other half of the focaccia on top, wrap in brown paper and tie together with twine or kitchen string.
    Although it sounds like a lot of effort, I got so many compliments on how wonderful they looked and they made transportation of the sandwiches easy as I didn't need to worry about them falling apart.

    Scrap Busting the Matryoshka Way

    I got gifted this doll pattern from Bee Sew Inspired and it's been on my want to make list since it came out. Initially I had a fleet of...