Showing posts with label recipes. Show all posts

Sunday, 7 August 2011

Barcelona and Rosehips

Rosehips are weird. I never know if I like them or not, and from all I heard and read it was always too risky to pick myself. Under ripe and apparently the seeds have dangerous or unpleasant effects on your throat and digestive tract, over ripe and it's hard to prepare them.  I always avoided rosehips until recently when just a couple of days before my summer holiday to Barcelona my fiancée's mum gave a good bagful of the cheery red baubles. I won't lie, although I recognised them, I was at a complete loss as to what to do with them. Eaten alone (seeds and all), they tasted okay, kind of earthy with a twinge or what might be called sweet or berry like. Standing in my kicthen after a brief search through the web to see what I could do with them in a short space of time, I found a recipe for a quickbread and candied rosehips, both of which were delicious. The quickbread is citrusy and sweet, coupled with the fun crunch of poppy seeds. As can be seen, it goes perfectly with a good mug of tea.

Once again I felt let down by Spain. This time I went with my then boyfriend, and now amazing fiancée. We landed in Catalan and endured a brown and withered landscape drive to Barcelona where to my dismay at least we found the place not brightly coloured and vibrant with life as expected, but more overcrowded with slum-like dusty houses - one of which was our apartment for our stay. Within four days I had been robbed twice and totally dependent on my other half but despite that it wasn't all bad.

The whole holiday was wonderful in so many ways, and we saw some breathtaking works of art. Gaudi's Cathedral Basílica i Temple Expiatori de la Sagrada Família was one of the highlights of our trip. As we stood in the main worship hall gazing around at the glory engulfing us, it felt like I had found a place so permeated with God, we spent most of the visit in awed silence, walking around wondering how one man managed to not just think up this grand design but also get a plan together enough to make it reality. The city was quite fun too in hindsight, we found an amazing little fondue restaurant called La Carassa tucked away in an alley with low lighting, embroidered drapes around the place with friendly and humorous waiters. We had an amazing fondue with crayfish and rustic bread; the night ending with a red carnation as we left the cosy nest to tipsily trundle through the night life of Barcelona.

Our flight home was uncomplicated and as we landed back in England, I heaved an internal sigh and I don't know about you but to me, it's good to be back home.

Rosehip Quickbread
(makes a 2Ib loaf)


Ingredients:
  • 4-5 Clementines, peeled and puréed plus water to make up to 1C/240ml
  • 0.5C/120ml Dried mixed fruit
  • 0.75C/180ml Rose hips, seeded and chopped
  •  2Tbsp/30ml Butter, melted
  • 1 Egg, beaten
  • 1-1.5C/360ml Plain flour
  • Scant 1C/200g Sugar
  • 1tsp/5ml Baking Powder
  • 0.5tsp/2.5ml Bicarbonate of Soda
  • 0.5C/100g Mixed nuts and/or seeds
    • I used 1Tbsp of Linseed, 1Tbsp Wheatgerm and 2Tbsp Poppy seeds
Method:
  1. In a large bowl, mix together: orange juice, mixed fruit, rose hips, butter and egg.
  2. Sift together dry ingredients: flour, baking powder, bicarbonate of soda, and sugar.
  3. Add Dry mix to wet mix and stir until just combined. Fold in the seeds gently.
  4. Spoon the mixture into a greased loaf tin (8" x 5"/20cm x 12cm) with a lined base and bake in a pre-heated oven at 350F/175C/GM3.5 for about an hour.

Thursday, 26 May 2011

Oaty Apple Cookies

I feel I should start this entry with a fat apology. I think it’s safe to say I’ve hit my first blogger’s block, although it’s not just the writing but the cooking too. Recently I’ve started a new job alongside my current one, which means I have practically no time to indulge in adventurous cooking or baking. A few days ago though I was reading a new entry by the Traveller’s Lunchbox blog and noticed a tempting cookie recipe. I thought about how much work I had to do and sadly left it alone. Last night however, after getting home from my second job, I decided I didn’t want to go back to work yet again and so began a soothing session in the kitchen. Tiredly I roamed around gathering bowls, spoons and scales, but as I laid my equipment out, a happy serenity floated over me. Tired I might be, but I’ve really missed baking; the weighing out of raw ingredients, the relaxed combining of everything into luxurious dough, filling the kitchen with a deliciously sweet aroma. How can one feel down with the scent of warm cinnamon and apples permeating through all the rooms of the house?

Thank you Miss Designer for seeing how I am and reminding me of my neglect of my poor blog. Hopefully as I adjust to new work hours, I will make time for more cooking and baking sessions, because like baking I’ve missed writing on my blog too!

Below is a cookie recipe adapted from and inspired by a recipe shared by the Traveller’s Lunchbox.  I decided to go for a fruitier option with oats instead of chocolate. After Easter, I find the joys of chocolate have left me somewhat and I welcome treats which omit it completely.

Soft Cinnamon, Oats and Apple Cookies
(Makes 8 large cookies)

Ingredients:
  • 5.5oz/160g Plain flour
  • ½ tsp Baking powder
  • ¼ tsp Bicarbonate of soda
  • 1 large Egg
  • 4oz/100g Butter, melted
  • 2.5oz/75g Brown Sugar
  • 2.5oz/75g Granulated sugar
  • 1 Tbsp (15ml) vegetable oil
  • 1oz/25g Porridge oats
  • 1oz/25g Mixed Fruit
  • 1 Apple, cubed (5mm) – about 4.5oz/125g prepared weight

Method:
  1. Preheat Oven to GM6/200C/400F
  2. Coat the apples in 1Tbsp of the white sugar and place in the oven to dry out for about 15-20 minutes – checking occasionally.
  3. Mix together the flour, oats, baking powder and bicarbonate of soda and set aside.
  4. Add to the melted butter the oil and mix well. Add the sugar and eggs and whisk until smooth.
  5. Fold in the flour mixture until evenly mixed then add the mixed fruit and apples and mix until evenly distributed. 
  6. Chill the mixture for 5-10 minutes until firm enough to roll into 8 golf ball sized pieces, then put on a tray and freeze for at least 30 minutes.
  7. Preheat the oven to GM6/200C/400F and lay about 4 balls of dough to a tray, spaced at least 5cm/2inches apart. Bake for 10 minutes then reduce the oven temperature to GM3/160C/325F and bake a further 10-15 minutes until the edges are golden. Switch the oven off and leave the cookies to cool on the sheet before moving to a wire rack. I left my cookies to set in the oven for about 5 minutes before removing to cool completely.

Saturday, 2 April 2011

How about a cake missing its main three elements?

Is anyone else loving the smell and sight of spring? I walked through an abandoned apple orchard today and as I entered the narrow gap, startled a young doe.  Blossoms were beginning to erupt but it will be several weeks yet before the whole orchard comes into bloom.  Walking down a path lined with pink blossom trees, I remembered the day a funnel of petals were gracefully swirling around me as I cycled to work. It is times like that where I realise and appreciate not just how breathtakingly splendid creation is, but also how transient. Walking down the same path today, the trees are still pink but missing most of their delicate blooms, which were instead adorning the green grass below.

Sitting here still giddy from the sun, I want to share with you yet another gluten free recipe. SPLAT! duty was last week, with the additional request, that not only that these should be gluten and dairy free but now also egg free. So the main components of a cake is basically, dairy (butter), wheat (flour) and eggs.  What happens when all three elements are removed? Some trawling through websites later and I found a perfect recipe on a food forum found here. I am a bit against gluten free flour although must admit it is good in a pinch, but they cost so much I've taken to making up my own mix.  I tend to use 1 part gram flour to 3 parts rice flour. I suspect fine cornmeal (polenta) can be used in place of rice flour too as that is cheaper still! When I get round to trying it, I will report back. Basically I find gram flour adds structure to a cake and acts in many ways as flour does. Its only downfall is its pungent taste when used in too high a proportion and undercooked; blend it with neutral flours though and it acts as a cheap alternative to gluten free flour.

Wandering down South Park today, we encountered a bright red ice cream van. One Mr. Whippy ice cream later, I happily stroll home, with the sun warming my hair celebrating the promise of more such days to come .  Below is my adaptation of the recipe provided in the link above.

Pear Cupcakes
(Makes 12)

Ingredients:
  • 25g/1oz Gram Flour
  • 75g/3oz Rice Flour
  • 1tsp Baking Powder
  • 0.5tsp Bicarbonate of Soda
  • 50g/2oz Brown Sugar
  • 1 Ripe Pear, grated
  • 2Tbsp Golden Syrup
  • 4Tbsp Sunflower Oil

Method:
  1. Pre-heat the oven to GM5/190C/375F
  2. Sift the dry ingredients (minus sugar) into a bowl to remove lumps, stir in the sugar and mix to combine.
  3. Finely grate the pear directly into the bowl, discarding the resultant lump of skin and pips and mix until well combined.
  4. Pour 1Tbsp of oil oil into the bowl then measure out 1Tbsp of golden syrup then repeat with the oil then golden syrup, then add the last 2Tbsp of oil. This helps the syrup not to stick to the spoon! Beat or whisk the mixture until well combined then spoon equally between 12 cases. 
  5. Bake for about 25 minutes until browned and springy to the touch. 

Thursday, 10 March 2011

A Perfectly Civilised Brownie

It's the weekend and I go back to my home town. An urge has been teasing my brain for a while, but cake or biscuits is not what I'm craving. They're just not chocolatey enough... Then one night I'm having a sugar-loaded conversation and I realise what I'm really craving is a soft, rich and gooey brownie.  A fun and longer than necessary trip to the supermarket with my candy loving boy and we're in the kitchen having fun throwing whatever we found into the silky mix of dark chocolate and butter. Putting the ginger marmalade and chocolate loaded mix into the oven, we waited in suspense until the timer beeped that 8 minutes was up. Yup. I did say 8. I got so carried away I failed to read my own handwriting which actually said 30 minutes. The result was a barely solid, sugary gooey puddle which we happily scooped with our fingers. So attempt one failed, and it took me a whole train journey back to Oxford and an extra day to find out why.

I've never failed so badly before so this did sting my inner baker's ego a bit, so much so I wanted a take two. I found myself in my kitchen a few days later, determined to make this recipe work.  I wanted orange and spice, and lots of chocolate.  So back to my notebook I went, reading everything through just to make sure I knew what I was doing, which is when I noticed my error. Suddenly it all made sense and I was calling myself all kinds of silly, but that's okay, I could now proceed with my experiment, confident in a higher chance of success.

Leftover Christmas mixed candied peel came out, crystallised ginger, ground ginger, an orange, extra dark chocolate... all went onto my worktop as I pondered proportions. I decided to err on the side of caution for ground ginger, but added the zest of a whole orange.  I wanted a warm spice mix, but humbled by my weekend disaster, I thought I would keep it simple for now. The result? A warm adult brownie, with bits of ginger and orange playing on the senses. Some tweaks I would consider next time is slightly less mixed peel, more ginger, some mixed spices and a shorter baking time for a softer, gooier brownie. The addition of a handful of nuts is another possibility, maybe walnuts or macadamia...

A Perfectly Civilised Brownie
(Makes about 20-24 squares)

Ingredients:
  • 50g Plain Flour
  • 100g Butter
  • 2 Eggs
  • 100g Dark Chocolate (70%)
  • 175g Granulated Sugar
  • 1 Level tsp Baking Powder
  • 25-50g Stem Ginger, chopped
  • 25-50g Mixed Peel
  • 1tsp Ground Ginger
  • Zest of 1 Orange
Method:
  1. Line a 18x28cm/17x11" tin with baking parchment and pre-heat the oven to GM4/180C/350F.
  2. Mix the ginger, mixed peel and ground ginger together and set aside.
  3. Melt the butter and chocolate together, along with the zest over a double boiler until melted. Beat the mixture until silky smooth.
  4. Remove from heat and beat in the eggs one at a time then the ginger, peel and spice mix until well combined.
  5. Pour into the prepared tin and bake for about 25-30 minutes until firm to the touch.
  6. Cool for 10 minutes and cut into squares.


Saturday, 19 February 2011

Cookies and milk go together like...

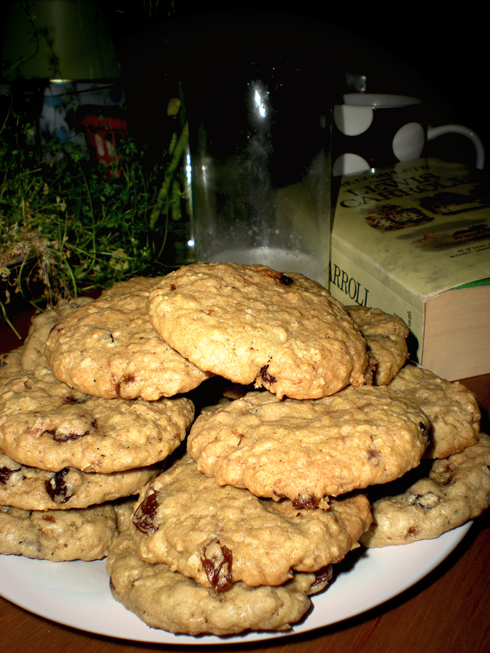
So lately I've been going through a bit of a nibbling phase, roaming around my house trying to find something to graze on, except... grazing is pretty hard to do when there's no food in the house. Two weeks ago is when I thought I needed to go food shopping, one week ago I thought I seriously need to buy food and today? I still had no food. What's a sick girl to do? Too ill to buy food, too peckish to sit at home without restlessly roaming the house, all that I found were sultanas which were kind of nibble food, porridge oats which are definitely not nibble food and a sealed block of chocolate I feel too guilty about breaking into since it was bought for baking.

Tired though I was, baking was my only option to stop myself going mad, so I stayed in the kitchen thinking about what I could do to fix this dire situation I was in. Flapjacks were considered, but with my sore throat, I didn’t think they were going to go down too well, cakes were another option, but then again they just didn’t seem to fit the bill for once… My mind drifted to the chewy cookies I made recently and I realised I haven’t just been craving nibbles; I was craving chewy cookies! Being house bound, I wanted less sweetness and more wholesome cookies so opted to tweak the basic recipe to yield chewy oat cookies, sweetened by sultanas and chocolate chunks. The result was just what I was hoping for – a cookie full goodness, not overly sweet and satisfied my bad case of the munchies.

Chewy Fruit and Oats Cookie
(Makes 24 small)

Ingredients:
  • 150g Plain Flour
  • ¼ tsp Bicarbonate of Soda
  • 90g Butter/Margerine
  • 50g Dark Brown Muscovado Sugar
  • 100g Granulated White Sugar
  • 1 Large Egg
  • 25g Mixed Fruit/Sultanas
  • 50g Dark Chocolate, chopped
  • 100g Oats, lightly toasted (optional)
Method:
  1. Place the butter in a large pan and melt over a low heat. Meanwhile mix the flour, oats and bicarbonate of soda together well. Set the butter aside to cool slightly.
  2. Beat the sugar into the butter followed by the egg.
  3. Stir in the flour mix until well incorporated, then fold in the chocolate and fruit.
  4. Level the mixture then cover with cling film and refrigerate for at least 30 minutes.
  5. Pre-heat the oven to GM5/190C/375F
  6. Drop teaspoon sized balls onto a baking sheet (I put about 8 on a small tray well spaced) and flatten.
  7. Bake for 10-12 minutes or until the edges have just about turned golden. They'll continue to cook on the tray for 1 minute then cool on a wire rack.

Saturday, 12 February 2011

Get lost in the broths...

My birthday lies almost annoyingly close to Christmas, but luckily I have sweet friends who (most of them anyway) understand that wrapping gifts in festive wrapping paper or writing a birthday message in a Christmas card makes for a very sad birthday girl, seriously. If it's disguised as a Christmas present it would probably be banished under the tree, exiled until Christmas day. Luckily, I do not even have awkward birthday moments any more since my lovely mother gave up trying to squeeze ideas for presents out of me by the time I was 18.  Instead I get lovely money and the benefit or having a birthday close to the BIG day is I get both lots in one go... I know, what's a girl to do? Go crazy on clothes? Buy ridiculous shoes? Splurge on something pretty and shiny? Or wonder into Anthropologie one day in January looking for clothes to splurge said money on, but instead getting "lost" in the homeware department and finds herself almost skipping out of the store with her shiny new purchases of... bowls. Yes bowls; but amazing bowls.  So amazing, I had to keep myself from buying one of every colour.  I digress though, there is a point to me mentioning my mad homeware obsession, and that is that they have inspired me to brave making soups again, but not the smooth ones I usually end up cooking up, but interesting thin soups holding delicate chunks of vegetables and grains to make hot, toasty meals perfect for the current climes where the chill is gone but a wet coolness has replaced it, calling for the need for warmth but without the heaviness of winter stodge.

One soup is my all time favourite so it amazes me that I've only made this twice, but it hails from my beloved Cornucopia at Home cookbook and is just love in a bowl.  The hearty broth is cheered up by shreds of deep green kale and cubes of bright orange carrot peeking thorough. The one thing I must say though - and this applies to all broths - is that the stock must be flavourful, as it unites all the components together. I found that this soup tasted better the next day as all the flavours mingled and developed. Next time, some miso or dried shitake mushrooms would make a wonderful base to dish.

The other dish was more accidental, but definitely one I will be making again.  As per usual, inspiration came from a poke around in the fridge to find food which wanted eating followed by a brief exploration of my store cupboard. The Barley, mushrooms and parsnip all pointed to a rather grey soup, so some carrots went in to brighten this meal up.  Some 45 minutes later and I'm happily curled up with my bowl of goodness.  Bon appetit!


Kale and Barley Broth
(Serves 4)

adapted from Cornucopia at Home by Eleanor Heffernan

Ingredients:
Stock:
  • 1 Onion
  • 2 Carrots
  • 2 Sticks of Celery
  • 1 Leek
  • 5 Bay Leaves
  • 10 Black Peppercorns
  • 1 tsp Thyme
  • 2.5L Water
  • Vegetable Oil
Soup:
  • 100g Barley
  • 2 Bay Leaves
  • 1 Onion
  • 2 Carrots
  • 1 Stick of Celery
  • 1 Leek
  • 2 Garlic Cloves
  • 200g Kale, sliced
  • 75g Dill
  • 2L Water
  • Extra Virgin Olive Oil
  • Salt and Pepper
Method:
  1. Cook the barley with 2 bay leaves in plenty of water, bring to the boil then simmer for 45 minutes to an hour until tender with a bite.
  2. Roughly chop the vegetables for the stock and heat some oil in a large pan. Fry gently for 10-15 minutes covered. Add the bay leaves, peppercorns, thyme and water, bring to the boil then gently simmer for 1 hour.
  3.  Strain the stock thoroughly when ready, to get about 2L.
  4. Blanch the kale for 3 minutes or until al dente, quench in cold water and set aside.
  5. To make the soup: Cover the base of a large pan with olive oil and heat. Slice the garlic finely and chop all the vegetables neatly into tiny cubes and sweat gently for 10 minutes, covered.
  6. Add the stock, bring to the boil then simmer for another 10-15 minutes until all the vegetables are tender.
  7. Blend a ladle full of soup with the dill then return to the pan. Add the strained barley and kale, season and serve hot with bread.  
Parsnip and Barley Broth
(Serves 1-2)

Ingredients:
  • 15g Butter
  • 1/4 Large Onion
  • 1 Garlic Clove
  • 1cm Thin Knob of Ginger, grated
  • 1 Stick of Celery, sliced
  • 1 Medium Thin Carrot, thinly sliced
  • 1 Parsnip, cubed into 1cm cubes
  • 2-3 Chestnut Mushrooms, thinly sliced
  • 1/4C/50g Barley
Method:
  1. Melt the butter in a pan and add the onions, garlic and ginger. Cook gently, covered for 5 minutes then add everything but the barley and cook covered for another 5-10 minutes. 
  2. Add the barley and mix to coat then add enough hot water to cover everything twice over (about 700ml), season and bring to the boil. Reduce to a gentle simmer and cook for 45 minutes to 1 hour until the barley is soft with a bite to it. Top up with water if necessary.
  3. Season with salt and pepper and serve.

Friday, 11 February 2011

Pasta Comfort

So I've just started up at work again properly, but for some reason it is taking me a lot longer to adjust to being employed in a serious job again.  Over the holidays I worked at my cinema back home, almost daily, almost always long shifts, yet I was fine.  My only conclusion is that my brain is no longer happy trying to pay attention to the likes of law and politics.  Fair enough really, I take my hat off to all you lawyers and politicians out there who have the stamina and genuine curiosity in that area.  I'm sure I will readjust soon, but in the meantime I'll drag my bike and myself up the hill to home sweet home for a comforting bowl of pasta.  At least cooking doesn't take unreasonable amounts of brain power!

Lurking around in my fridge was some leftover cheese sauce from my lasagne made the night before, a couple of mushrooms and scrap ends of cheese, which all went towards making this wonderfully comforting lunch which fed one sleepy person who perked right on up. Enjoy!

Earthy Mushroom Spaghetti
(Serves 1 greedy person)


Ingredients:
  • 75-100g Spaghetti
  • 1/2 Sm Onion
  • 2 Garlic Cloves
  • 15g Butter
  • 100g Chestnut Mushrooms, thinly sliced
  • 25g Manchego (Ewe) Cheese, finely grated (optional)
  • Few Chive strands to garnish
  • About 200ml Leftover Cheese Sauce (or see below to make from scratch)
Cheese Sauce:
  • 1 tsp flour
  • 10g butter
  • 200ml Milk
  • 1/4 tsp Dried Thyme
  • 25g Extra Mature Cheddar, grated
  • Salt and Pepper 
Method:
  1. Boil some salted water for the pasta, then make the cheese sauce - I like my sauce quite thin so I use less flour.  Add more flour if you want it thicker.  Melt 10g butter in a small pan, add the flour and beat around for a minute or so to cook the flour. Whisk in the milk gradually then add the herbs and season. Bring to a simmer, stirring constantly until thickened, add the cheese and set aside.
  2. Add the pasta to the boiling water and cook for about 9-11 minutes until al dente.
  3. Melt the rest of the butter in another pan and fry the garlic and onions gently, covered for 5 minutes until the onions look tender. 
  4. Turn up the heat and add the mushrooms then fry for another 5-10 minutes or until they start to brown.
  5. Season with pepper, mix in the cheese sauce and heat through.
  6. When the pasta is done, drain then mix in with the mushroom sauce until well combined. Stir in most of the Manchego cheese briefly.
  7. Serve sprinkled with the remaining Manchego cheese and garnish with chives.

Thursday, 10 February 2011

Gluten-Free and Dairy-Free Muffins

Every month or so I have cake duty for SPLAT! at St Ebbes, a play group for toddlers where mummies can enjoy a slice of cake, hear about Jesus and just socialise.  I get the special dietary requirements duty and I've had some good results and some not so good results when trying to produce cakes and biscuits which contained no wheat, milk, butter, oats.... apart from the Tunisian orange cake and layered chocolate cake, the rest tend to either go stale immediately or taste powdery and dry, or worst: taste and feel disgusting, so much so I feel bad handing them over!

My birthday was in December and amongst my wish list was a dinky little book written by Jennifer Katzinger, founder of the Flying Apron Bakery based in Seattle.  Apart from type errors regarding number of muffin cups to pour batter into, it is a very good read and the recipes work beautifully - well the two that I've tried.  I won't lie, the batter looked unpromising, but the result was magic.  There's no other word for it when I think about what goes into your typical muffin: flour, butter, sugar, eggs.... all of which are absent from these deliciously soft muffins.  If you're intolerant to gluten or dairy, or just vegan, this book is amazing.  Naturally the honey is easily interchanged with agave nectar or maple syrup.  Below, I'll leave you with two recipes adapted from my beloved copy of the flying apron's gluten-free and vegan baking book.

Carrot Muffins
(Makes 16)

Ingredients:
  • 1C Rice Flour
  • 1/2C + 1/8C Gram Flour
  • 0.75 tsp Bicarbonate of Soda
  • 0.75 tsp Ground Cinnamon 
  • 1/2C Groundnut Oil
  • 1C Water
  • 1C Honey
  • 3 Sm Carrots, Finely grated
  • 1C Unsweetened Dessicated Coconut
  • 1C Chopped Mixed Nuts
  • 1/2C Mixed Dried Fruit
Method:
  1. Pre-heat the oven to GM4/180C/350F
  2. In a large bowl, mix together the oil, water and honey.  In another bowl mix together the carrots, nuts, fruit and coconut, and in a final bowl, mix together the rice and gram flours, cinnamon and bicarbonate of soda.
  3. Whisk the flour mix into the wet mixture until well combined.  Fold in the carrot mixture until just combined and divide among muffin cases.
  4. Bake for 20-30 minutes until the tops are  golden and firm to the touch.


Lemon & Poppy Seed Muffins
(Makes 14)

Ingredients:
  • 1.5C Rice Flour
  • 3/4C Gram flour
  • 1.5 tsp Bicarbonate of Soda
  • 1/2C Olive Oil
  • 1C Water
  • 1/2tsp Cider Vinegar
  • 1/2C Maple Syrup
  • 1/2C Golden Syrup
  • Zest of 2 Lemons
  • 1/3C Poppy Seeds 
Method:
  1. Pre-heat the oven to GM5/190C/375F
  2. In a large bowl, mix together the oil, water, vinegar, golden and maple syrup.  In another bowl, whisk the rice flour, gram flour, bicarbonate of soda, poppy seeds and lemon zest together well.
  3. Whisk the dry mixture into the wet mixture until well combined.  
  4. Pour the batter evenly between about 14 muffin cases and bake for 20 to 25 minutes until golden and firm to the touch.

Chewy Triple Chocolate Almond Cookies

What is it about cookies and biscuits that is just so moorish?  Especially when it's not quite cheery enough to ponder outside unless absolutely necessary. One cold weekend I found my mind drifting to the kitchen; it is the natural place to drift to when the house feels empty and cold.  A rummage through the treasure trove and I have myself a promising start for a cheerful batch of cookies.  The night will be filled with dancing, but in the meantime I can bake.

I found this basic recipe on the endless resource pool that is Google in my first year of university, and now lovingly return to it with some modifications.  Scooping out chunks of cookie dough is just so satisfying, feeling the mixture stickily mould in my hands into balls of scrumptious goodness.  After affectionately flattening the discs, they spent a short time basking in the oven to come out as large discs of chewy heaven.  The house is now a warm, glowing haven filled with the sweet scent of chocolate and warm thoughts...

Chewy Triple Chocolate Almond Cookies
(Makes about 20)

Ingredients:
325g Plain Flour
1/2 tsp Bicarbonate of Soda
175g Butter/Margarine
100g Dark Muscovado Sugar
200g Granulated Sugar
1 Large Egg
1 Egg Yolk
100g Whole Almonds, chopped
50g Dark Chocolate Chips
50g White Chocolate Chunks
Method:
  1. Place the butter in a large pan and melt over a low heat. Meanwhile mix the flour and bicarbonate of soda together well.  Set the butter aside to cool slightly.
  2. Beat the sugar into the butter followed by the egg and egg yolk.
  3. Stir in the flour mix until well incorporated, then fold in the chocolate and almonds.
  4. Level the mixture then cover with cling film and refrigerate for at least 30 minutes.
  5. Pre-heat the oven to GM5/190C/375F
  6. Drop walnut sized balls onto a baking sheet (I put about 8 on a small tray well spaced) and flatten.
  7. Bake for 10-12 minutes or until the edges have just about turned golden.  They'll continue to cook on the tray for 1 minute, then cool on a wire rack.

Monday, 7 February 2011

Carrot and Coriander Plait

I feel I should start this post with a huge apology for being out of action for so long.  Time has flown by in the last couple of months, but now that the festive season is over and life is returning to normal, I should hopefully be back to cooking lots and sharing them with you.  I thought would start the beginning of a new month with bread. We can't go wrong with bread, bread makes my world go round.  Even better, homemade bread... and better than that? Flavoured bread! I decided on carrot and toasted coriander seeds this time, and it was wonderful.  The loaf came out of the oven golden orange with flecks of coriander seeds peeking out at me.

I love making bread, especially on a day where I'm not needed anywhere. Making bread is associated to a day of rest for me.  I knead the dough at my own pace, lovingly tip it into an oiled bowl and potter around the house until it's ready to be knocked down and shaped.  This time I decided to take a walk with my new house mate in the late winter sun, enjoying the warmth on my face as we trundle along.  This time of year is wonderful. Everything smells of hope and a taster of spring is beginning to creep in, reminding me it is only a few months before the sight of daffodils and other colourful joys start popping up again.  Until then though, we have cheerful bread...

Carrot and Coriander Bread
(Makes 2Lb Loaf)


Ingredients:
  • 375g Plain Flour
  • 125g Wholemeal Flour
  • A pinch of Salt
  • 70ml Vegetable Oil
  • 1.5 tsp Dried Yeast
  • 240ml Warm Water
  • 1 medium Carrot, peeled and grated
  • 1 Tbsp Coriander Seeds

Method:
  1. Mix the yeast and warm water together and leave for 15 minutes to activate and a frothy layer forms on top.
  2. Toast the coriander seeds over a medium heat in a frying pan until lightly browned and aromatic. Tip into a pestle and mortar to bruise the seeds.
  3. Mix together the flours and salt, then combine with the oil.  Once evenly distributed, grate in the carrot and tip in the coriander seeds.  Stir to distribute.
  4. Make a well, pour in the yeast mixture, stir to make a dough and roll out onto a lightly floured surface to knead.  Knead for about 10 minutes until smooth and elastic, and tip into a lightly oiled bowl.  Leave covered in a warm place to double in bulk for about an hour and a half.
  5. Knock the dough down, divide into three balls and roll each one into a long sausage shape.  Press the ends together on one end and plait the strands, sealing the ends together. Pat into shape and leave to prove for 30 minutes more, covered.  Switch on the oven to GM 4/180C/350F to pre-heat.
  6. Bake the plait for 40-45 minutes until lightly golden and the base sounds hollow when knocked.  Turn out onto a wire rack to cool.

Sunday, 19 December 2010

Savoury Canapes and a Gluten-Free Cake

A view from my bedroom

Like many others in the South of England I woke up find a surreal wonderland blinking back at me in the late morning sun. You know how when your part of the world is just blanketed with this smothering, fluffy, white sheet, how the light quality subtly changes but it takes a while to realise the cause?  I love that feeling, it's not very often one gets to experience it, all too soon the chaos of snow catches up with us and we soon wish it gone again.  Although laughed at when I first bought them, my new snow grips have proved to be a Godsend.  Unlike many I have the freedom to roam around the outdoors relatively freely, to really enjoy the snow without fear of slipping ungracefully - not to mention probably painfully on to my unsuspecting behind! With my magical shoe attachments, I was free to buy food for my house Christmas meal with pleasure, not to mention collect my missing button from a lovely elderly woman down the road who I work with.  With that I will stop going on about how much I love my shoe chains and talk about things related to my blog, that's right food.

Gluten-free Layered Chocolate Cake with Clementine and Cognac Whipped Cream

I love December, it's the season of festive eating not to mention the one time it's perfectly acceptable to pile on the pounds without comment.  So far I have had several Christmas dinners in the form of Latin-style tapas, traditional four-course vegetarian meal Exeter-College style with carol singing in-between courses, Asian buffet and two house ones in the guise of "practice" and "real".  Other things I get excited about this season are the carol services by candlelight and festive craft evenings where delectable canapés are served around talented women.  This year I failed to make an appearance due to going on a last minute dancing weekender which was fantastic, but not before leaving my canapé contributions for the church.  Last year I went for tomato and basil puff pastry stars but this year I went for slightly more daring and chose: savoury filled mini palmier, goats cheese filled profiteroles and mini cheese and tomato filled scones (Recipe below).  My house mate and I were just discussing how at first sweet things are gushed about but without fail, the savoury (unless they're boring dry sandwiches) bites will always go first, why is that?

My Canapé selection for the Craft Evening

I had great fun making the canapés, especially the palmier which were easier to do than I imagined.  They will definitely be made again.  The Profiteroles as you can see from the photos are unfilled, and I don't recommend filling them until they're ready to be served as they then can't be re-crisped in the oven.  Upon saying that though I tried one (or five) filled after a day and although not crispy they still had a wonderful taste and texture, they're just that bit nicer straight out the oven.  With that I leave you with a handful of canapé recipes, and a cake recipe which is coeliac friendly that I made for our "real" house Christmas dinner.

Layered Chocolate Cake
(Serves 10)

Ingredients:
Cake:
  • 250g Dark Chocolate (around 70%)
  • 190g Butter/Margerine
  • 3Tbsp Rum
  • 125g Ground Hazelnuts/Almonds
  •  - Flour can be used if not required to be gluten-free
  • 5 eggs
  • 190g Granulated Sugar
  • 1tsp Baking Powder
  • 4-6Tbsp Apricot Conserve
  • Icing to dust
Cream:
  • 300ml Double Cream
  • Zest and Juice of 1-2 Clementines
  • 1Tbsp Brandy
Method:
  1. Pre-heat the oven to GM3/160C/325F and line a swiss roll/baking tin
  2. Over a double-boiler, melt the chocolate and butter together gently, stirring until smooth and glossy.  Remove from heat and stir in the alcohol if using.
  3. Meanwhile, whisk eggs and sugar together until the mixture thickens and falls in thick ribbons rather than a thin stream.
  4. Gently fold in chocolate mixture until no streaks remain and repeat with the flour.
  5. Pour into the tin and level, then drop carefully from a height of about 10-15cm to remove large air bubbles and bake for 20-30 minutes until a skewer comes out with a few crumbs on. Leave in the tin to cool for 5 minutes.
  6. On a cooling wrack, place a liberally pierced baking paper to line it and transfer the cake onto it to cool completely.  Score across the long part of the cake to divide it into three equally.  
  7. Once cool, cut one slice and transfer to serving dish/board. Beat the apricot to loosen and spread liberally across the sponge.  Top with a second piece of cake and repeat with the jam and top with the final piece.  Trim the ends to neaten and dust with icing sugar and Clementine zest.
  8. Cream: To make the cream, pour everything into a jug and whisk until soft peaks form.

    Homemade Tomato Paste
    (Makes enough for all canapés listed)

    Ingredients:
    • 400g Tinned Tomatoes
       -plus swill water - 1/4 can
    • Olive Oil
    • About 100ml of red wine
    • 1 Onion, finely chopped
    • 1 Garlic Clove, crushed
    • 1 Carrot, finely ch
    Method:
    1. Gently fry the onion and garlic until softened.
    2. Add the wine and bubble away for a few minutes and add the tomatoes with a 1/4 can water to swill out the can. Bring to the boil and simmer moderately partially covered until reduced by half.
    3. Blend roughly to thicken the sauce.  I used this one batch for my mini pizzas, palmier and scone filling.

      Savoury Palmier
      (Makes lots)

      Ingredients:
      • One block Puff Pastry (500g)
      • Sundried Tomato Paste or Homemade Tomato Paste (as above)
      • A few Basil Leaves, shredded
      • 50g Soft Goats Cheese, crumbled
      • A few Black Olives, finely chopped
      • 100g Mature Cheddar Cheese, finely grated
      •  Salt and Pepper
      Method:
      Left to right: Unbaked, puffing up in the oven to the finished palmier
      1. Cut the pastry block into 4 lengthwise so you end up with 4 long thin strips.
      2. Roll out each separately on a lightly floured surface until about 3mm thick - try to roll so that the rectangle shape is maintained.
      3. Spread two of the rolled out sheets thinly with tomato paste, sprinkle thinly with a mix of olives, basil and goats cheese. On the other two sheets, spread moderately with grated cheese, salt and pepper.  Maybe add some very finely chopped onion, chives or shallots. 
      4. Roll lengthways from both ends so they meet in the middle and fold over each other.  Roll lightly into shape and chill for 5 minutes in the freezer, wrapped in cling film. 
      5. Slice just less than 1cm thick and lay out on a non-stick baking tray. Reshape if necessary by pulling apart the rolled bits a bit and pinching the fold lightly to form a heart.
      6. Bake in a pre-heated oven GM7/220C/430F for about 20-25minutes until golden.
      7. Cool on a cooling wrack and pack into airtight tins.  These can be re-heated before serving by giving them 5 minutes in a hot oven (at least GM6/200C/400F)

        Mini Star Cheese, Chive and Mustard Scones
        (Makes lots)
        Ingredients:
        Scones:
        • 175g Self-Raising Flour
        • Salt and Pepper
        • 25g Butter
        • 1 Med Egg, beaten
        • About 30ml/2 Tbsp milk 
        • Handful of Chives, chopped
        • 1-2 tsp Wholegrain Mustard
        • 75g Mature Cheddar Cheese
        Filling:
        • About 4 Tbsp Tomato Paste
        • About 50g Full-fat Cream cheese
        • Chives or Shallots, finely chopped
        Method:
        1. Pre-heat the oven to GM 7/220C/425F and grease a baking tray.
        2. Mix together the flour, salt and pepper then rub in the butter.  Reserve a handful of cheese for the topping and stir in the rest along with the chives.
        3. Add the egg and enough milk to make a soft dough.  Roll out to about 1.5cm/0.5" thick and use mini cutters about 1-1.5cm/0.4-0.5" diameter to cut out as many shapes as possible and place evenly on the baking tray.  These will not spread much so you can happily put lots on, just make sure there's a bit of a gap between each.
        4. Brush the tops with milk then sprinkle with cheese and bake for 8-10 minutes until risen and golden.
        5. Leave to cool then cut in half. Spread one side thinly with tomato paste, the other with cream cheese.  Sprinkle some shallots or chives on and sandwich together. 

          Mini Wholemeal Pizzas
          (Makes 15-16)

          Pizza Dough:
          • 100g Plain flour
          • 100g Wholemeal flour
          • 1tsp/7g Yeast
          • 125ml Warm water
          • Homemade Tomato Paste or tomato purée
          • Spinach, sliced thinly
          • Cheddar Cheese, finely grated
          • About 8-10 Black olives, finely chopped
          • 1-2 Shallots, finely chopped
          Method:

            1. For the dough: Mix the yeast and water together, combine all the dry ingredients together and pour in the yeast mix and mix to make a dough. 
            2. Transfer to a surface, lightly floured if necessary and knead until smooth - about 5 minutes
            3. Let the dough rest for 30 minutes and proof.
            4. Pre-heat oven to GM9/240C/465F. 
            5. Divide into 15-16 balls, and flatten into discs.
            6. Spread with tomato then top with cheese, shallots, olives and spinach.  Don't over-top or it'll go all soggy and horrible.
            7. Bake for 10-20 minutes until the cheese is all melted and the base look slightly golden.
             
              Savoury Filled Profiteroles
              (Makes about 30)

              Ingredients:
              • 60g/2.5oz Plain flour
              • 50g/2oz Butter
              • 150ml Cold Water
              • 2 Large Eggs
              • Salt and pepper
              Filling:
              • 500ml Cream
              • 100g Goats Cheese
              • Pinch of salt
              • Handful of chopped chives
              • Ground Black Pepper
              Method:
              1. Pre-heat oven to GM6/200C/400F.
              2. Melt the butter and water together as fast as possible then remove from the heat.
              3. Beat in the flour until a ball forms.
              4. Beat in the eggs gradually and continue beating until a creamy and shiny mixture results.
              5. Season then pipe onto two greased and dampened baking trays.  Each ball should be about a teaspoon's worth of Choux pastry.  Leave at least 2cm between each all - I fit about 15 per tray.
              6. Bake for 10 minutes then increase the oven temperature to GM7/220C/425F and bake for another 15-20 minutes until golden.
              7. With a pair of scissors, cut the profiteroles at the top to let steam escape and cool on a wire rack.
              8. Meanwhile make the filling: Mix together the goats cheese, cream and chives together.  Season with salt and pepper then whisk until thick enough to pipe.
              9. When cool, pipe each profiterole with the cream mixture.  

              Tuesday, 16 November 2010

              Healthy Cinnabon anyone?

              Every month I go home - and every month as I finish church, I find myself walking in a wonky line into the local T. K. Max.  Unusually though, their clothes hold no interest for me, but their homeware department on the other hand... oh my.  I can happily float around the store and lovingly look at their Le Creuset range, or their farmhouse crockery ranges, flirting with the idea of buying a set of oven dishes or a large earthenware casserole pot; sadly though I do not have my own place and so space is an issue.  As I walk around the store I continue to furnish my future home in my head.  This time though I broke the mould a bit and found myself gazing at their book selection - naturally the cookbook area.  Fingering the slightly dusty spines, a hardback - beautifully photographed popped out at me.  At first the initial cynicism kicked in, whereby I thought that if the poor book made it to a discount store it was bound to be fussy with recipes a mission to follow, ingredients impossible to get hold of even if I knew what they were, and I could go on, but I won't - because this book is truly a gem of a cookbook.  As one review said, it gets respect straight away just by not featuring a single cupcake anywhere - don't get me wrong though, I love a cute cupcake as much as the next person - it's just refreshing to find a baking book which doesn't bank on the fact it contains cupcakes to appeal to its audience.

              Are you wondering what this amazing book is called yet? Probably not, but if you are curious, it is called Warm bread and Honey Cake by Gaitri Pagrach-Chandra.  It is a rich book containing history, life anecdotes, and wonderfully simple recipes of baked treats from around the world.  I must say the selling point for me was the in depth feature on the Red Bean Paste cakes commonly enjoyed as mooncakes which is eaten once a year by the Chinese community during the mid-autumn festival where friends and family join together to enjoy watching the moon in its full glory.  The whole book is filled with similar enchanting treats along with a highly fascinating history on how they came to be.  For my house mate's birthday a gluten-free version of her chocolate slice cake was made with ground almonds - although there was enough to serve a small army, this cake disappeared alarmingly fast between 4 chocoholics!  Today though I will leave you with my fruity adaptation of Gaitri's chocolate and hazelnut buns.

              Fall Buns
              (Makes 8-9)


              Ingredients:
              Dough:
              • 125g wholemeal flour
              • 125g plain white flour
              • 1.5tsp Dried active yeast
              • 2tsp Sugar
              • Pinch of Salt
              • 55g/2oz/0.5stick Butter, melted and cooled
              • 1 Egg, beaten
              • About 150ml/5fl oz/2/3C Milk, lukewarm

              Filling:
              • 2 Medium/200g approx. Bramley/Tart Apples, chopped into 5mm chunks approx.
              • 50g Raisins
              • 2Tbsp Honey
              • 1Tbsp Cinnamon

              Method:
              • Whisk together all the dry ingredients, then mix the butter, milk and egg together, add to the dough and mix to bring together into a ball of dough.  Knead for about 10 minutes until the dough is smooth and elastic ( I find I do not need extra flour in the worktop).  If the dough is too sticky, add a sprinkling of flour, if too dry, add a few drops of water.
              • Oil a the bowl, return the dough and coat in the oil then cover with cling film and leave to double in bulk in a warm area - about 1-1.5 hours.
              • Before rolling out the dough, chop up the apples, mix with the honey, and cinnamon and raisins then set aside.
              • Roll out the dough to a rectangle roughly 40cm x 30cm or 16" x 12", then spread with the apple mixture - but leave about 2cm clear all round.
              • Roll up the dough into a sausage starting from the longest edge.  Cut along at 4cm intervals into 8-9 spiralled buns and tuck into a greased round or square cake tin, about 20cm in diameter/width.
              • Cover loosely with a damp tea towel or cling film and leave to rise again for another 30-60 minutes in a warm place until almost doubled in bulk.
                NB: The juices from the apples may leak out into the tin, don't worry about this, it shouldn't affect the bread!
              • Roughly in the last 15 minutes, pre-heat the oven to GM4/180C/350F
              • Bake the buns for 25 minutes or until golden brown.  Leave to cool for 5 minutes then transfer to a wire rack to cool completely - or enjoy warm!

              Sunday, 14 November 2010

              Hazelnut Fudge

              This weekend, my rock n' roll friend celebrated her birthday in a pub situated (to me anyway) in the middle of nowhere, and it was a fantastic night - what with a skittle alley, giant connect four, friendly people and of course, dancing! If you want to check this dinky pub out, it is called The Red Lion situated in Islip, Oxford.

              I was having one of these "I keep losing time to do things" day, and needed to rustle up a quick birthday present. Luckily for me, I was looking up gift ideas last night and remembered a favourite easy fudge recipe which can be found on the Waitrose website in their handy recipe archive. Below is my adaptation of their fruit and nut version. I decided on a gift-packaged batch of homemade fudge with a homemade birthday card containing the recipe.  As the fudge is really rich, I cut the slab into small cubes and wrapped them in tissue paper, tied with a bow and placed into a box made from arty paper - which I then promptly threw into my handbag as was late and had to find said friend's obscure habitat! Typical... Anyway, this recipe makes lots, and I had to freeze the remaining condensed milk.  I hope it will be OK! I feel the outcome of it will probably warrant another post.  In the mean time though I leave you with a quick and easy fudge recipe which does not require the faff of a sweet thermometer! 

              Hazelnut Fudge
              (Makes lots)


              Ingredients:
              • 200g Good dark chocolate
              • About 200g Sweetened condensed Milk
              • 100g Icing Sugar, sifted
              • 50g Hazelnuts, finely chopped
              • 1Tbsp Frangelico/Hazelnut liqueur (Optional)
              Method:
              1. Line a 21x21cm tin or similar with baking parchment.
              2. Heat up about 1cm water and place a heat-proof bowl over the pan, making sure the base does not touch the water.  Melt the chocolate pieces and condensed milk together gently and stir until all melted.
              3. In the mean time, if hazelnuts are whole, either crush or chop with a knife or pulse blitz in a processor, but make sure you do not over-process!
              4. Remove the melted chocolate mixture from the heat and stir in the liqueur if using then add the nuts and icing sugar and mix until well combined.
              5. Spread the mixture into the lined tin, level out and dust with sugar and cocoa then chill in the fridge for at least 2 hours preferably until firm. 
              6. Cut into cubes, re-dust with sugar to avoid sticking and enjoy!

              Saturday, 30 October 2010

              Orange and Lemons...

              For a short period in October, the theme appears to be orange and black - you guessed it, it's around the time of Halloween.  I really dislike this combination, although I am a huge fan of the saffron orange which just conjures up the impression fiery warmth and life.  Another reason why I love the colour orange is that it reminds me of the fruit as well, which comes in beautiful gluts at this time of the year.  Naturally then, this glut will feature somewhere in the form of a cake, and this happens to be one of my all time favourite cakes.  Tunisian orange cake was first introduced into my hemisphere as I worked at Harbour Lights behind the bar.  It is in effect a light citrusy sponge drenched in an orange syrup and tastes much better the next day as the flavours mingle and time has allowed the sponge to really absorb the syrup.  The recipe was found in a Waitrose Kitchen magazine (Oct '10) as a feature of a family-run cafe called The Main Street Trading Company which resides in Scotland.  If you're ever around the area, check it out, it looks so inviting!  In the meantime though, I leave you with their recipe.

              Tunisian Orange Cake
              (Serves 8)


              Ingredients:

              Cake:
              • 45g Polenta
              • 200g Caster sugar
              • 100g Ground almonds
              • 1.5tsp Baking powder
              • 215ml Olive oil
              • 4 Eggs, lightly beaten
              • Zest of 1 Orange
              • Zest of 1 Lemon
              Syrup:
              • 45g Granulated sugar
              • Juice of 1 Orange
              • Juice of 1 Lemon
              • 1/4 of a large cinnamon stick
              Method:
              1. Line the base of a 19/20cm cake tin with baking parchment and grease the sides with some oil
              2. Mix together the dry ingredients of the cake: polenta, almonds, baking powder, caster sugar and zest.  Beat the eggs and oil together, then whisk into the dry mixture.
              3. Pour into the prepared cake tin and put into the cold oven.  Switch on the oven to GM 5/190C/375F and bake for 50-60 minutes, until lightly golden and a skewer comes out clean when inserted into the centre.  Leave to cool in the tin for 5 minutes then transfer to a cooling rack.  
              4. Meanwhile, put the granulated sugar, orange and lemon juices and cinnamon stick into a pan and heat until all the sugar is dissolved, stirring often. 
              5. Skewer holes all over the cake and pour the syrup over the cake gently, giving the cake time to absorb the liquid.  Place a baking tray underneath the cake to catch the juices!

              Wednesday, 27 October 2010

              Much to do about a Pumpkin

              What does usually think of when Halloween once again pops overs for a visit? Well in this household it is what to do with the Jack-O-Lantern left behind? Leave it to go mouldy and try to dispose of it without touching it? Or, chop it up and make it into hearty meals thereby giving Jack a purpose to his short life other than to look spooky-but-not-really for one night.  Naturally we chose the latter, and so jack soon became among other things, part of a lasagne, soup, quick bread and pie.   Jack, you have done well and we look forward to seeing you again next year!  Until then, below will be a record of your invaluable contributions to our happy bellies.

              Pumpkin Lasagne:
              (Serves 4)

              This came about as a result of copious bottles of opened red wine sitting around and a craving for something indulgent but wholesome and a need to empty some almost-finished boxes of lasagne sheets.  I used tinned plum tomatoes, as I don't know about you but for some reason I really do not like the taste of chopped tomatoes!  Try cherry tomatoes too, they are divine in a sauce.

              Ingredients:


              Red Wine Sauce:
              • About 400g Pumpkin, cubed (1cm)
              • 1 Small Pack (250g) Spinach, Chopped
              • 2 Red Onions, chopped
              • 2 Garlic Cloves, crushed and chopped
              • 1 Carrot, Finely chopped
              • 1 Celery stalk, finely chopped
              • 1Tbsp Fresh Sage, chopped
              • 400g Tin of tomatoes
                 -Plus 1/4 Can Water to swill and add to pot
              • 200ml Red Wine
              • 1Tbsp Oil
              White Sauce:
              • 1tsp Dried Thyme
              • 300ml Milk
              • 25g Butter
              • 1Tbsp Flour
              • 50g Strong Cheddar Cheese, finely grated
              • Nutmeg, grated
              Method:
              1. Pre-heat the oven to GM6/200C/400F
              2. Coat the pumpkin with oil, salt and pepper and roast in oven for about 45 minutes until tender
              3. Coat the base of a large pan with oil (I used sunflower), add the onion, garlic, carrot and celery and gently heat for about 15 minutes with the lid on, stirring occasionally. 
              4. Add the red wine to the vegetables and simmer uncovered gently for about 5 minutes to evaporate the alcohol, then stir in the sage, tomatoes and water.  Break up the tomatoes and stir to mix, then bring to the boil and simmer partially covered for 20-30 minutes gently until all the vegetables are tender.
              5. Meanwhile, pan-fry the spinach in a little oil, and season with nutmeg and pepper.  Set aside.  (I actually used mature spinach from the garden which takes slightly longer to cook, but equally delicious).
              6. Heat the milk and add the thyme until almost boiling.  Remove from heat, season and leave aside to infuse.
              7. Blend the red wine sauce until mostly smooth and stir in the cooked lumps of pumpkin.  Season with salt and pepper.
              8. To make the white sauce, melt the butter gently until sizzling, add the flour and stir over a low heat to cook for about a minute.  Stir in the milk gradually over a medium heat to prevent lumps (whisk if lumps form or keep stirring) until the sauce thickens.  Season and set aside.
              9. Assembly: In a oven-proof dish, layer half the red wine sauce, top with half the spinach then sheets of wetted lasagne sheets.  Top lasagne sheets with the remaining red wine sauce and spinach then another layer of wetted lasagne sheets.  Press down the sheets gently to level and pour over the white sauce.  Top with the grated cheese and put the lasagne in the oven for about 30 minutes until the whole thing is bubbling hot and the top golden.

              Pumpkin and Ginger Teabread:
              (Serves 10)


              This recipe was taken from the BBC Good Food website which was mildly adapted to suit my caeliac of a housemate to be gluten-free.  It's best served warm straight from the oven in my opinion or microwaved for a few seconds on high later on.  Other than plain and simple, I liked spreading Nutella on top of my slice for a little bit of chocolate naughtiness.  I made this in a tray baked for about 50 minutes but of course times vary with ovens or tins used.  The site recommends 50-60 minutes in a 2lb loaf tin.


              Ingredients:
              • 175g butter , melted
              • 140g clear honey
              • 1 large egg , beaten
              • 250g raw peeled pumpkin, coarsely grated
                 -(about 500g/1lb 2oz before peeling and seeding)
              • 100g light muscovado sugar
              • 350g Gluten-Free self-raising flour
              • 1 tbsp ground ginger
              • 2 tbsp demerara sugar
              Method:
              1. Preheat the oven to 180C/gas 4/ fan 160C. Grease and line the base of a tray bake with baking paper.
              2. Mix the butter, honey and egg and stir in the pumpkin or squash. Then mix in the sugar, flour and ginger.
              3. Pour into the prepared tin and sprinkle the top with the demerara sugar. Bake for 40-50 minutes, until risen and golden brown. Leave in the tin for 5 minutes, then turn out and cool on a wire rack. Serve thickly sliced and buttered.
                NB: I found with gluten-free flour the cake was slightly more fragile, so handle with care!

              Pumpkin Pie
              (Serves 4)

              Ingredients:

              Filling: 
              • 300g Pumpkin, cubed (1cm)
              • 2 Bay Leaves
              • 1 Courgette, sliced
              • 1 Clove Garlic, crushed and chopped
              • 1 Small Onion, chopped
              • 1 Carrot, finely chopped
              • 1 Celery, sliced
              • 100g Green Lentils
              • 1/4tsp Dried Tyme
              • 1 Tomato, cubed
              • 150ml Red Wine
              • 200ml water (made up with courgette pan juice)
              • 2Tbsp Soya Sauce
              Topping:
              • 3 large potatoes (about 300g), peeled and quartered
              • 1 Small Bunch Dill (25g)
              • 1Tbsp Wholegrain Mustard
              • Knob of butter
              • Splash of milk
              Method:
              1. Pre-heat oven to GM6/200C/400F
              2. Boil some water with a bay leaf and enough to cover lentils generously and cook for 30-45 minutes until tender.
              3. Coat the pumpkin in oil and season before roasting for 30-45 minutes in the oven until tender.
              4. Heat some oil in a frying pan and pan fry the courgettes over a high heat until lightly singed and withered. Season and set aside.
              5. Swill out the pan and make up to 200ml to make some stock.
              6. In a pan, coat the base of the pan with oil and add the onion, garlic, carrot and celery - cover and cook gently for 15 minutes, stirring occasionally. 
              7. Add tomatoes and cook until softened then add wine and simmer for 5 minute uncovered to evaporate alcohol.  Add the stock, bay leaf, thyme and soya sauce, bring to the boil and simmer covered for about 20-30 minutes until all vegetables are tender.
              8. Meanwhile, boil some salted water and cook the potatoes for about 20 minutes or until tender.  When cooked, mash with butter, mustard and enough milk (about 75-150ml) to make a smooth spreadable mash.  Stir in the dill and season.
              9. Blend the sauce when ready and stir in the pumpkin, courgettes and lentils then seaso.
              10. To assemble: Pour the filling into an oven-proof dish and top with the the mash, level out roughly and bake in the oven for about 30 minutes until bubbling hot and golden.

                Tuesday, 12 October 2010

                Forcaccia and the first of the Autumn Soups

                My last post raved about the beauty of autumn, but does anyone else feel the slight pressure to cling to the light meals of summer still?  It is that strange phase of change where my body just has not had a chance to adapt yet.  The weather so far has swung between summer sunshine to waking up to a sparkling frost blanketed scene.  Autumn's harvest bounty is steadily growing though so I thought I would introduce the first of my experimental autumn recipes.  Naturally it would be soup, and naturally I would find inspiration for it by rummaging through my fridge.  Stupidly though after a thorough search through my house, the scrap of paper containing my recipe is gone (for good? who knows?) so I will have to just let your imagination fill in the blank!  It involved carrots, parsnips, celery, mushrooms and soya sauce, partially blended to make a thick earthy broth.


                The other night as I was on a baking spree, I decided to make some bread again.  I feel the bread section of this blog needs padding out and bread making is just the most satisfying experience.  This time, after being tempted to make some Mediterranean forcaccia I settled for some aromatic fennel forcaccia instead which has a milder flavour so more potential for different sandwich fillings!  Happily I discovered that fennel forcaccia and ugly root vegetable autumn soup marries together beautifully with lashings of butter.

                I also love it sliced in half with butter and yeast extract for breakfast, hummous with St-Paulin cheese for lunch or spread thickly with yummy jam as an any-time snack.

                Fennel Sandwich Forcaccia:
                (Serves 8-10)

                Ingredients:
                • 2 Cups Warm water
                • 1.5tsp/7g Sachet Dry yeast
                • 1tsp Sugar
                • 3Tbsp Extra virgin olive oil
                  -plus extra to glaze
                • 1.50tsp Salt
                • 1Tbsp Fennel seeds
                  -plus extra to spirinkle
                • 1 Cup Wholemeal/Brown flour
                • 5 Cups Plain/Bread Flour
                • About 2Tbsp Cornmeal/Polenta to dust
                Method:
                1. Stir the yeast and sugar into the warm water and leave until foamy - at least 10 minutes.
                2. In a bowl, mix togehther  along with the yeast mixture, wholemeal flour, salt and olive oil.
                3. Gradually add the remaining flour until a dough forms and turn out onto a floured surface and knead until smooth.  Return the dough to an oiled bowl, coat in the oil by rolling then cover with a damp tea towel or cling film.  Leave the dough to rise until doubled in bulk - At least an hour.
                4. Oil a baking sheet/pan and dust with fine cornmeal/polenta, then roll out the dough to roughly fit the pan.
                5. Press the dough into the pan until about even, cover and let rise for another hour or so.  The dough should be tender to the touch.
                6. Preheat the oven to Gas Mark 6/200C/400F during the last 15 minutes.
                7. Dimple the dough with fingertips, brush with olive oil, sprinkle with fennel seeds and bake for 30 minutes in the bottom third of your oven, or until lightly golden.  Cool on a wire rack. 

                Monday, 11 October 2010

                Autumn Harvest - Apples


                Finally, we have come to this beautiful time of year again where the temperature is starting to fall, the air is slightly crisp and the leaves are gradually donning their gilded coats of golds, russets and saffron.  Autumn is my favourite season visually, in terms of the smell in the air - slightly toasty and earthy and of course the abundance of delicious food.  Cue, plump squashes, leafy spinach, chard, various stoned fruits and of course rosy apples and juicy pears!  Goodbye Mediterranean, hello homey comfort food.

                Last week, my house mate and I went scrumping for apples in the derelict orchard down our road which our wonderful nature loving neighbour brought to our attention.  Previously we have drenched our shoes as we trudged about picking brambles and plums in the wet forest, so this time we had the bright idea (well at the time) or wearing flip flops which resulted in a slightly treacherous session in the forest among the clumped nettles, thorny bramble vines snaking across the floor and vertical twigs grappling to skewer our feet.  All in all though,  some tree climbing and clever dodging later, I was triumphantly walking home with my apple bounty.  At home though, after filling a bucket, the problem arose of what to do with it all?

                So in the near future, expect lots of sweet apples treats to be popping up!  So far, I have made rum soaked apple layer cake (yummy but ugly), apple crumble (naturally), apple cupcakes, apple and custard muffins, potato and apple boulangère (Not recommended) and the list will hopefully go on.  Until next time, I leave you with an apple and custard muffin recipe adapted from my M&S cakes books.

                Apple and Custard Cakes:
                (Makes 12 muffins)


                Ingredients:

                • 90g Butter
                • 110g Caster Sugar
                • 2 Eggs
                • 110g Self-raising flour
                • 30g Custard Powder
                • 2Tbsp Milk
                • 1-2 large apples (200g total), cored and thinly sliced
                • 1Tbsp Extra butter, melted
                • 1Tbsp Ground cinnamon
                • 1Tbsp Sugar
                Custard Filling:
                • 1Tbsp Custard Powder
                • 1Tsp Sugar
                • 125ml Milk 

                Method:


                Custard Filling:
                1. Mix a little milk with the custard and sugar to form a paste.  Heat the remaining milk, mix with paste and heat gently until thickened.  Cover and leave to cool.
                Cake mix:

                1. Pre-heat oven to 180C/350F/GM 4 and line a 12-hole muffin tin with paper cases.
                2. Beat together butter and sugar and custard powder until soft and creamy, then whisk in eggs gradually.
                3. Whisk in the milk and fold in flour until just combined (a figure-of-eight motion with the whisk is very effective).
                4. Divide half the mixture among the paper cases, top with custard, then finish with distributing the last of the cake mix among the 12 cases.  Top with sliced apples, pressing in slightly and bake for about 30 minutes. Meanwhile, combine 1Tbsp sugar with ground cinnamon and set aside. 
                5. Turns cakes onto a wire rack, brush with melted butter then sprinkle with the sugar and cinnamon mix. Leave to cool on the wire rack or serve warm.

                Saturday, 9 October 2010

                Poppy Seed Bread

                I feel I should start off this post with a massive apology for not updating for a long while, truth be told I haven't been cooking anything inspiring lately and life's not too bright at the moment, what with a bike crash accident and a lack of supporting job. On the good side though, I've had time to dance more and read more cookbooks. One book I find myself referring to time and again is the Cornucopia at Home cookbook from Dublin's wholefoods vegetarian restaurant. We came across this tiny treasure cove a few years back, and it's heartening to know that the restaurant is doing so well, it's expanding into the building next door.  Rarely, does one find a cookbook and cook through it's contents eagerly, but I have progressively gone through most of the recipes in this book and I can confirm that most of the recipes work beautifully with surprisingly little hassle ending in a homey and delicious meal at the end of my enjoyable labour.

                I finally decided to delve into the bread section of the book recently and tried out their poppyseed load which I have to say was delicious and entertaining seeing poppy seeds make a break for it as I kneaded the dough into a ball of smooth, elastic dough.  I really do not see the point in buying a bread machine when this part of the bread making process is just so soothing.  Upon saying this though, waking up to the smell of bread is lovely and can only be achieved by hand by a dedicated early riser... which I am not. I tend to find myself baking at night so I go to bed to the smell of fresh bread instead which is equally good as I have the anticipation of fresh bread in the morning.

                This bread was lovely with blackberry & ginger chutney and goat's cheese, as well as dunked into thick and creamy soups or simply spread with jam for breakfast.  With that I leave you with a recipe and hopefully an incentive to buy this wonderful cookbook.

                Poppy seed Bread
                (Makes a 2Lb loaf)


                Ingredients:

                • 250g wholemeal/Brown flour
                • 250g plain flour
                • 70g poppy seeds
                • Pinch of salt
                • 70ml vegetable oil
                • 1.5tsp active dried yeast
                • 280ml warm water
                • 0.5tsp honey

                Method:

                • Stir the yeast and honey gently into the warm water and leave to foam for about 10-15 minutes
                • Combine the flours, poppy seeds and salt into one bowl - I used a whisk to mix the dry ingredients together well.   
                • Add the oil and mix well using your fingers to rub the oil into most of the flour.  Just like rubbing butter into flour for pastry.
                • Make a well in the centre of the bowl and pour in the yeast and water mixture.  Mix with your hands until you get a soft ball of dough.
                  NB: if sticky, sprinkle more flour and conversely, if too dry, add water a drop at a time to the right consistency.
                • Roll out onto a clean surface (I didn't bother with dusting with flour and it was fine) and knead for about 10 minutes.  Oil the bowl (which should be clean of dough), turn the dough to coat it in the oil and cover with a damp tea towel or clingfilm.  Leave to rise for 1-1.5 hours in a warm place or until doubled in bulk.
                • Knock back/punch the dough to its original size and either put into a 2Lb tin or shape into a loaf shape.  
                • Leave to rise for another 30 minutes - in the last 15 minutes, pre-heat your oven to 180C/350F/GM 4.
                • Slash (do not tear) across the top of your loaf 3-4 times with a sharp knife and place in the oven for 50-60 minutes (tin) or 40-50 minutes if free-form loaf.
                • The bread is ready when it sound hollow when tapped at the base and lightly golden.
                • Leave to cool on a wire rack.  Cover with a tea towel of you want a soft crust. 
                adapted from Cornucopia at home by Eleanor Heffernan

                  Scrap Busting the Matryoshka Way

                  I got gifted this doll pattern from Bee Sew Inspired and it's been on my want to make list since it came out. Initially I had a fleet of...